Implementing Camera Path Navigation Transition in UE5
In the previous post, I introduced how to implement inertialized camera transitions in UE5. This type of transition guarantees that velocity and acceleration are continuous at both the start and the end, making it highly suitable for transitions between Gameplay cameras and Cinematic cameras.
However, in actual game development, we often need to use an explicitly provided path (Spline) to guide the camera transition path, similar to a PathNode. This is usually done for two reasons:
To avoid collisions during the transition process.
To ensure the camera moves along a specific path to satisfy a particular design requirement.
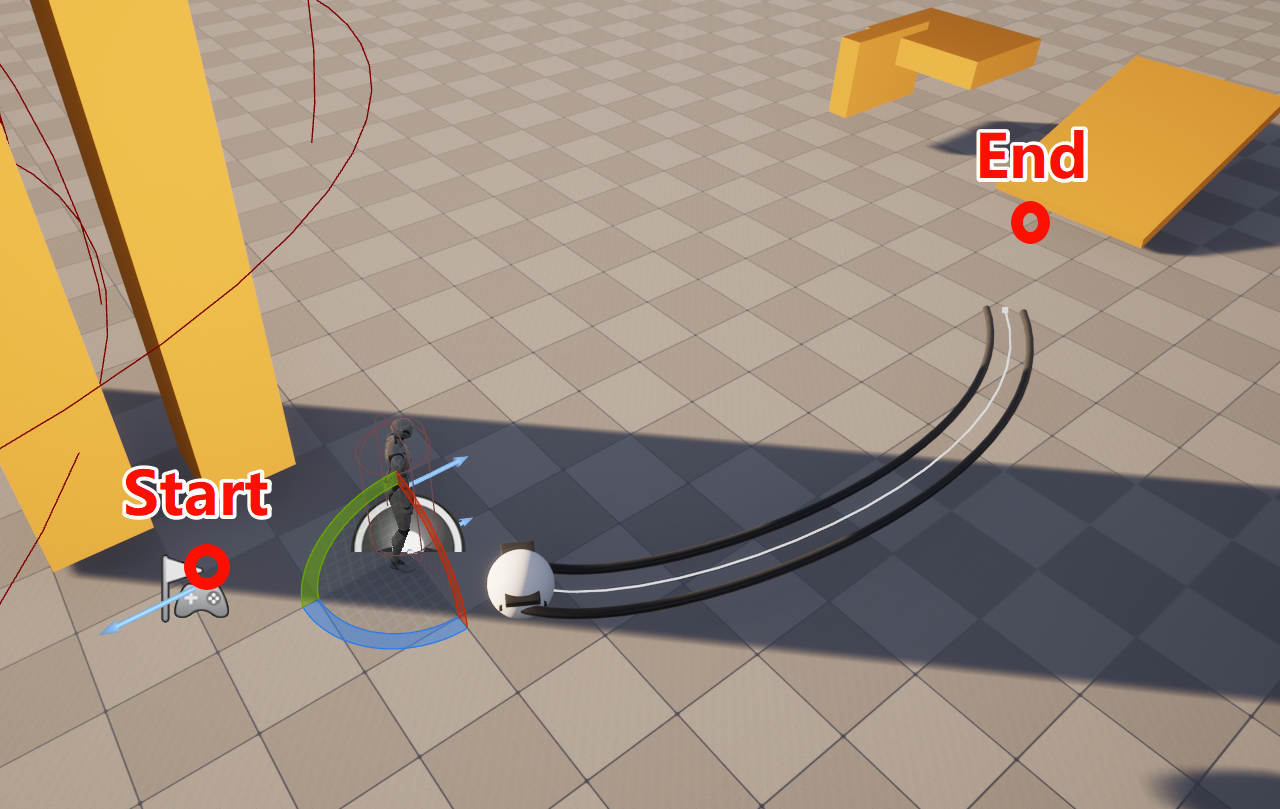
For example, in the image below, given a specific Spline section, we want the camera to move along this Spline as much as possible.
However, this raises two additional problems:
The starting point of the camera is often not fixed. How do we ensure a natural connection from the starting point to the Spline?
How do we ensure smooth camera movement throughout the entire transition process, rather than having it speed up and slow down erratically?
This article will introduce two methods to implement a Path Guided Transition.
Method 1: Inertialized Transition As A Bridge
Since we want the camera to remain smooth throughout the transition, the natural question is: can we utilize the Inertialized Camera Transition to achieve this smoothness?
Yes, we certainly can. If we create a Virtual Camera on the Spline provided by the designer and have this camera move according to a specified movement curve, we can then utilize two Inertialized Transitions to achieve an overall smooth transition.
The first Inertialized Transition occurs between the Source Camera and the Virtual Camera, ensuring a smooth transition from the initial camera to the Virtual Camera. The second Inertialized Transition occurs between the Virtual Camera and the Target Camera, ensuring a smooth transition from the Virtual Camera to the destination camera.
To do this, we need to specify the following parameters:
Driving Transition: The transition that drives the progression from Source Camera to Target Camera (typically a Smooth/Linear/Cubic Transition).
Rail: The Spline provided by the designer.
Guide Range: The timing for entering the Virtual Camera from the Source Camera, and the timing for exiting the Virtual Camera to transition to the Target Camera. Time is normalized to [0,1].
Spline Move Curve: How the Virtual Camera moves along the Spline. Time is normalized to [0,1].
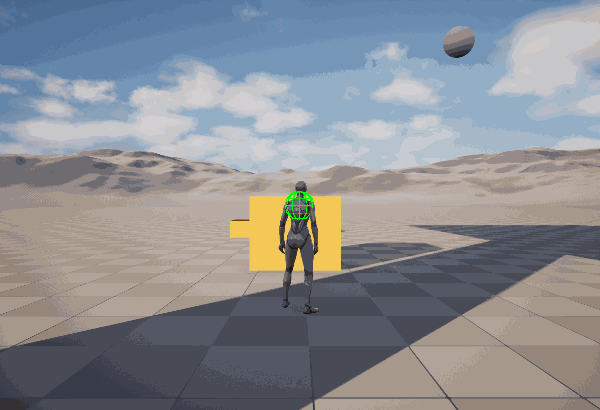
Below is the resulting effect:
And the generated path:
It looks pretty good. However, this method requires precise fine-tuning of several parameters, especially the Spline Move Curve, to ensure overall velocity smoothness.
The first method requires too many parameters. Can we avoid manual tuning? In other words, can the designer simply configure a Driving Transition, and the camera automatically moves along the path at the specified speed?
Naturally, this is possible. We just need to construct the complete transition path at the moment the transition begins. The designer provides a part of the path, and we need to fill in the missing segments at the beginning and the end.
Unreal’s Spline uses Cubic Hermite Splines by default. Each Spline segment is defined by two target points p0,p1 and their corresponding tangents d0,d1. Since we already know the Spline provided by the designer, as well as the positions of the initial camera and the target camera, we can construct optimized start and end segments. By stitching these with the designer-provided Spline, we form a complete camera movement path.
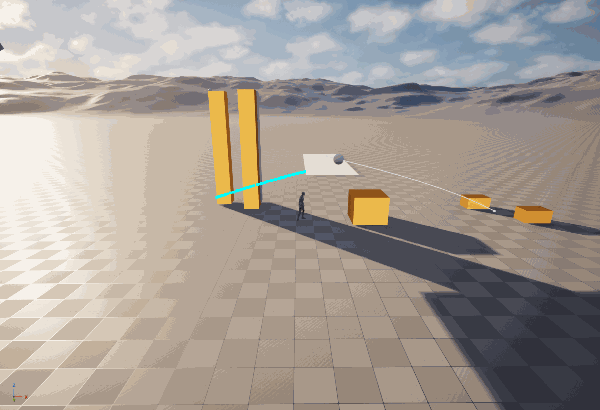
The constructed path is as follows:
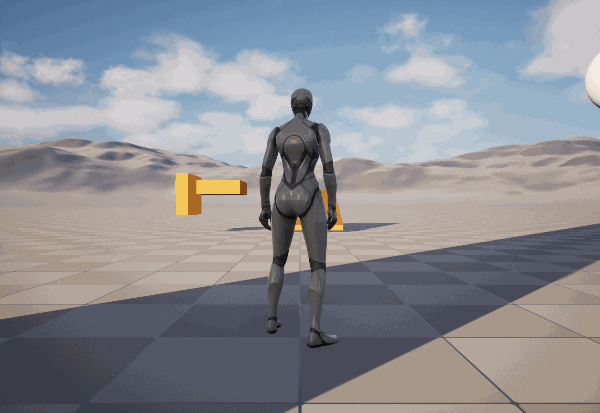
The actual movement is as follows:
However, a drawback of this method is that the endpoint of the path is determined when the Transition starts. If the target camera moves during this process, a “pop” or sudden jump will occur at the end of the transition. Of course, we could dynamically modify the constructed Spline during the transition, but the overhead of using Unreal’s default functions is too high, so we might need to use empirical methods for a more efficient implementation. Secondly, when constructing the start and end segments, the corresponding tangent d uses the camera’s own velocity. The Spline constructed this way may not necessarily yield the best path globally, so more global factors need to be considered when selecting tangents.
UENUM() enum classEComposableCameraPathGuidedTransitionType : uint8 { // Use inertialized camera as a bridge to achieve path guided transition. Inertialized, // Use auto-generated splines to achieve path guided transition. \n // @NOTE: This type won't update TargetCameraPose, so if the target camera is moving during transition, DO NOT use this type. Auto };
/** * A transition which utilizes a path (spline) to guide its position during transition. * This transition leverages two InertializedTransitions to achieve smoothness. * An intermediate camera will be spawned as a wrapper for the spline. * So this transition will be more expensive than other transitions. */ UCLASS(ClassGroup = ComposableCameraSystem) classCOMPOSABLECAMERASYSTEM_API UComposableCameraPathGuidedTransition : public UComposableCameraTransitionBase { GENERATED_BODY()
public: // Driving transition for base camera transition. Used for both Inertialized and Auto. UPROPERTY(EditAnywhere, BlueprintReadWrite, Instanced) UComposableCameraTransitionBase* DrivingTransition;
// Type of path guided transition. UPROPERTY(BlueprintReadWrite, EditAnywhere) EComposableCameraPathGuidedTransitionType Type { EComposableCameraPathGuidedTransitionType::Inertialized }; // The rail actor thet contains the desired guiding spline. The tangents of the spline should not be too small nor too large. UPROPERTY(BlueprintReadWrite, EditAnywhere, meta = (EditCondition = "Type == EComposableCameraPathGuidedTransitionType::Inertialized", EditConditionHides)) TSoftObjectPtr<ACameraRig_Rail> RailActor;
// Normalized timestamps to start/end guide. It's recommended to set a not-close-to-one end timestamp ensuring the camera can return to the desired target position smoothly. UPROPERTY(BlueprintReadWrite, EditAnywhere, meta = (ClampMin = "0", ClampMax = "1", EditCondition = "Type == EComposableCameraPathGuidedTransitionType::Inertialized", EditConditionHides)) FVector2D GuideRange { 0.25, 0.75 }; // How the virtual camera should move on spline. This curve is normalized. Input range is [0,1], start c[0]=0, c[1]=1. UPROPERTY(BlueprintReadWrite, EditAnywhere, meta = (EditCondition = "Type == EComposableCameraPathGuidedTransitionType::Inertialized", EditConditionHides)) UCurveFloat* SplineMoveCurve; private: UPROPERTY() AComposableCameraCameraBase* IntermediateCamera { nullptr }; UPROPERTY() ACameraRig_Rail* Rail; UPROPERTY() UComposableCameraInertializedTransition* EnterTransition { nullptr }; UPROPERTY() UComposableCameraInertializedTransition* ExitTransition { nullptr }; UPROPERTY() USplineComponent* InternalSpline; UPROPERTY() AActor* DebugSplineActor; private: voidDrawDebugSplinePoints(const TArray<FVector>& SplinePoints); voidBuildInternalSpline(const FComposableCameraPose& CurrentTargetPose, float DeltaTime); };
int32 Num = InternalSpline->GetNumberOfSplinePoints(); for (int32 i = 0; i < Num; ++i) { Points.Add( InternalSpline->GetSplinePointAt(i, ESplineCoordinateSpace::Local) ); }
InternalSpline->ClearSplinePoints(true);
// Prepend and append control points (as long as their tangents) FVector P0 = Points[1].Position; FVector P1 = Points[0].Position; FVector P2 = UKismetMathLibrary::InverseTransformLocation(DebugSplineActor->GetActorTransform(), StartCameraPose.Position); FVector P3 = UKismetMathLibrary::InverseTransformLocation(DebugSplineActor->GetActorTransform(), SourceCamera->LastFrameCameraPose.Position);
// Re-add points for (Num = 0; auto& P : Points) { P.InputKey = Num; InternalSpline->AddPoint(P, false); ++Num; }
InternalSpline->UpdateSpline(); }
Summary
This article briefly introduced two methods for camera path-guided transitions, achieving the initial requirements. Clearly, there is still much room for optimization, such as:
Smoother movement at the boundaries.
Constructing better movement paths.
Supporting Mutable Source/Target Cameras.
This article serves as a starting point for further discussion, and I do believe improvements can be made to achieve better results and easier use.