The camera system inside Unreal Engine provides very basic functions.
It merely enables the camera to follow a target with limited adjustable
paramters such as offset, camera distance, lag, etc. We would like a
more powerful camera system, like the Cinemachine toolset in Unity, to
facilitate creating more interesting and compelling visual experience
for gameplay. In most 3D adventure games, a 1v1 camera is required when
you fight with a BOSS and you need to look at the BOSS however you move
and cast skills. Unfortunately, 1v1 camera is not a built-in function in
UE, so we have to implement our own version of 1v1 camera.
In this post, I will share with you how to implement a minimum 1v1
camera in UE using only blueprints, based on some simple mathematics. If
you are more familiar with coding, you can also implement this 1v1
camera with only few lines of code.
Start
with A Simple Case: Mathematical Derivation for Camera Location and
Rotation
Constructing the equation
The most crucial two parts of any camera behavior are the
location and rotation, the former
determines where the camera is and the latter controls where the camera
looks at.
Let us first begin with a simple case: assume the follow location is
, the look-at location is
, and the look-at point
is fixed at the center of the screen. We introduce a
Follow Screen X parameter (denoted by ) controlling the relative x-axis
offset of the follow point on the screen space. If , the follow point will be on the
center of the screen; if ,
the follow point will be on the rightmost position of the screen; if
, it will be on the
leftmost position of the screen. At this stage, we do not take
Follow Screen Y into consideration for simplication.
To determine camera location and rotation, consider a sphere centered
at the origin. Assume camera distance (the distance of the camera to the
follow point) is , pitch angle
, yaw angle
, we can write
down the camera location before applying the follow point offset:
Note that is the
raw camera location relative to the origin. The look-at
direction, however, is , and the actual
camera location is . For integrating
, we can assume the camera
offset is , hence, the
final camera location is , and
the look-at direction from camera to is .
Because does not
change the orientation of camera, the camera's look-at direction, as we
have stated above, is still . It is obvious that we have
the following equation:
where is an unknown
coefficient satisfying as we
want the look-at target is farther than the follow target to our camera.
Before wo go ahead solving this equation, we should determine at the first place.
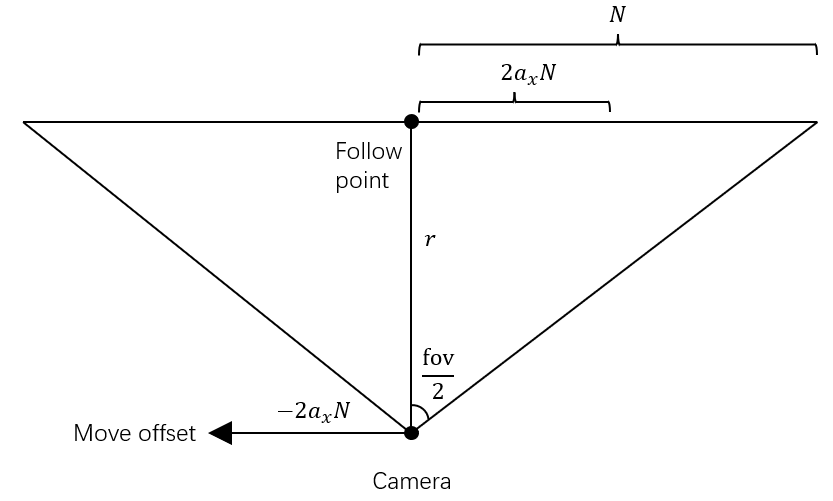
Determining
We can easily express in terms of and the field of view of the
camera. As shown in the following figure, we have:
where is the world-space
length of half screen. Then, the offset amount is (note that when , the offset amount will be ), and the offset direction will be the
opposite of the sign of . That
is, is , camera will
translate left, otherwise it will translate right.
Plug into , the directional offset magnitude
will be .
A remaining question is which unit vector this offset will be applied
along? The answer is the camera's local right direction. It can be
readily computed by taking the cross product between camera's local unit
forward vector and
world space up vector :
Normalizing the result, and considering that UE's coordiante system
is based on the left-hand rule, the local unit right vector will be
.
Thus, the consequent offset vector is:
Determining and
With , we can now
determine and . Expanding , we have:
Simplifying , we
have:
which leads to three equations:
Rewrite , we
have:
Plug into and :
Combining and , we have:
To note, when or , the above equation also
holds. Divided by on both sides, we have:
The tinted values and should be calibrated according to
the sign of and . It's particularly noteworthy
that when ,
should be:
and ,
and ,
and ,
and ,
However, the value returned by lies within and should be further
altered according to the observation above. It can be easily concluded
that:
For , we notice that when
is positive and gets larger,
the camera's yaw will decrease, so the real beta will be . Summing
up the corrected values, we reach the true camera yaw .
The second problem, which is very palpable, is that can be smaller than or larger than , when the denominator — the distance
between follow point and look-at point — is small. If this value exceeds
the bound and we clip it, the resulting yaw and the subsequent pitch would be incorrect, making odd
camera artifacts.
Here are several potential workarounds to deal with this issue:
Dynamically adapts to
ensure the absolute value of is
no larger than .
Introduce the concept of soft zone and apply
damping just as Cinemachine does.
Method two might be a better way because it has smooth result. We
will get to this in later sections of this post, and now we focus on
implementing method one, which is much simpler to achieve using
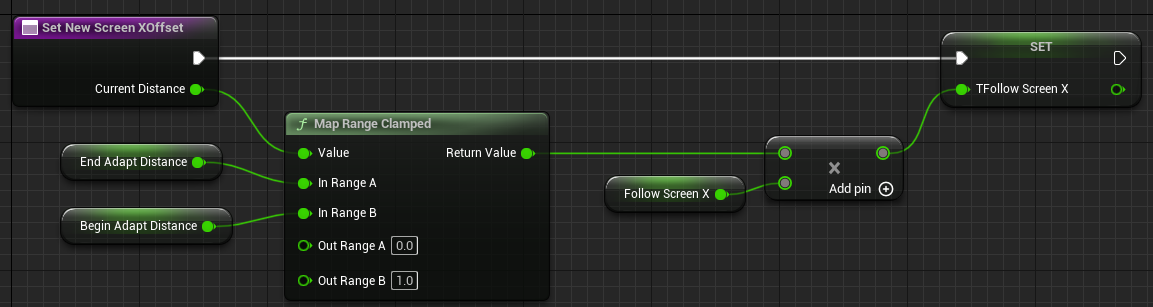
blueprint. All we need to do is to set a
BeginAdaptDistanceX and EndAdaptDistanceX that
adapts when is
within the range of .
More concretely, when the distance is within the range, new will be .
When both values are set to zero, no scale is applied, when is negative,
will have its minimum (the
absolute value) greater than zero. It is very effective and flexible to
use this value in order for avoiding zero-division as will be introduced
in . Directly clamping
between will not bring about satisfactory
results.
Note that we leave out the case when since for most of
the time the player character and the enemy will not be on the up axis
at the same time.
Once we have , we
can easily find out . By
(or equivalently), we have:
You may ask what will happen if is close to zero? Well, this could not be
a problem as we have already dynamically adapted with respect to the follow-lookat
distance, as long as the values of BeginAdaptDistanceX and
EndAdaptDistanceX are properly set.
What are
when ? From , we know ; then from
and using
the fact that , we have
.
Final camera location and
rotation
To summarize, we first compute and with :
Then we calibrate and
:
the addition is the yaw we want: . To
remedy the issue of overflowing when is
small, we impose an range in which the raw screen offset is dynamically adjusted and achieve
smooth camera motion.
The camera pitch can be readily computed:
Eventually, we can compute the camera location and rotation. Location
is , and
rotation can be set to look at .
Here is a video showcasing this camera with different parameter
values.
Here is the blueprint I make to implement this camera. It is now a
little out of order and I will make it more readable and extensible in
next sections.
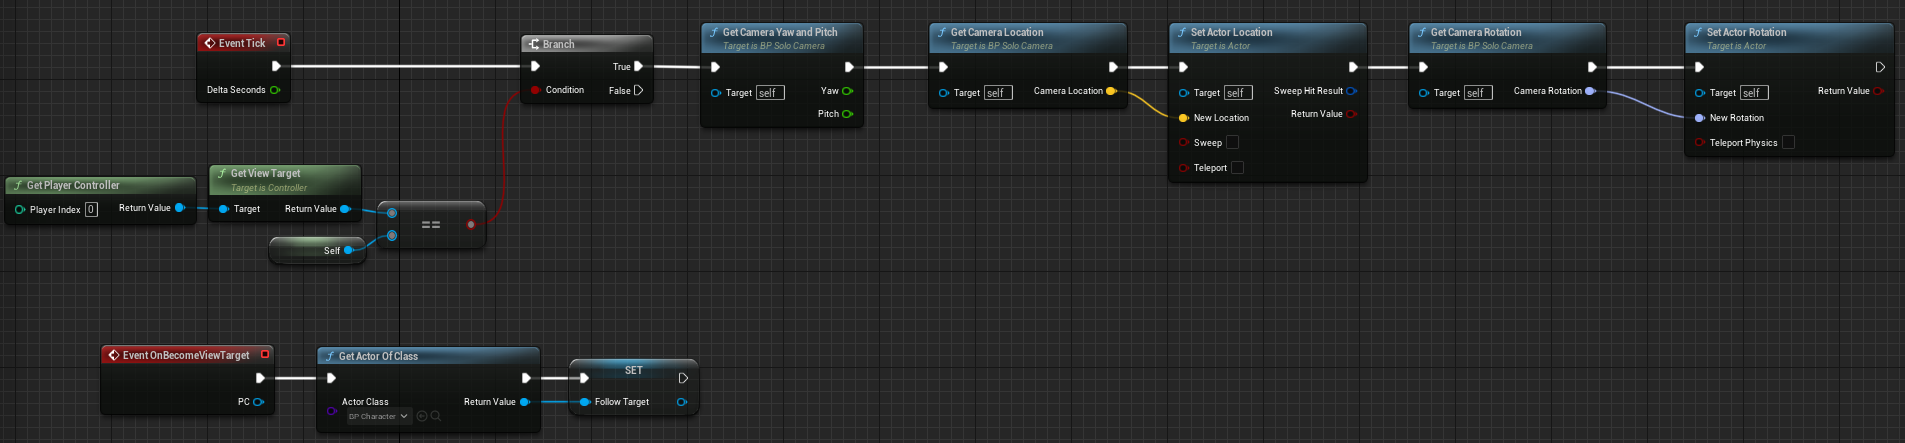
In the main graph, we get camera yaw and pitch, get camera / rotation
and set them in each frame.
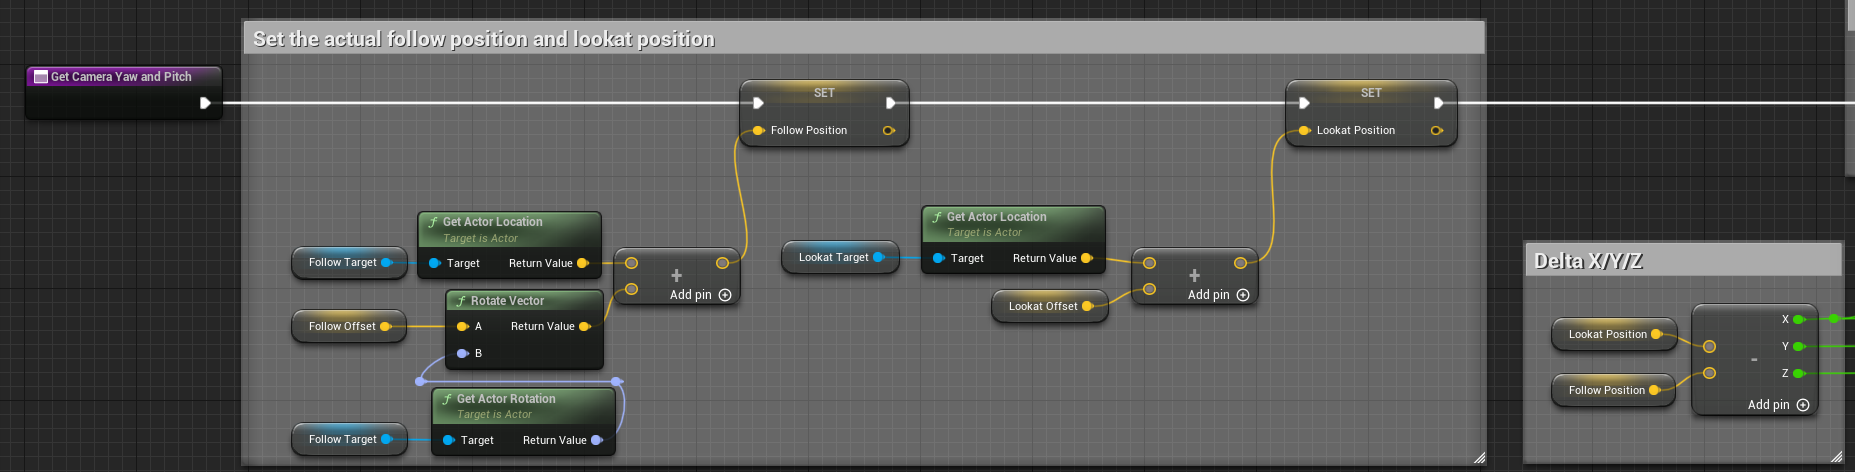
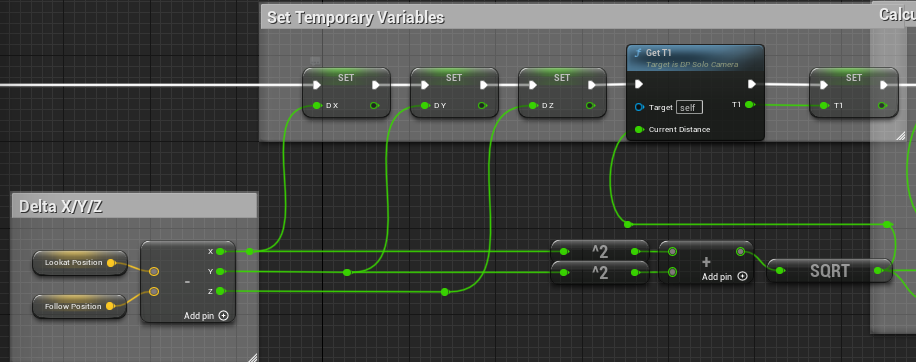
The GetCameraYawAndPitch function starts with applying
the follow position and look-at position offset. Note that the follow
position offset is based on the follow target's local coordinate.
Then, we store temporary variables including and .
Last, we compute yaw and pitch, and return them.
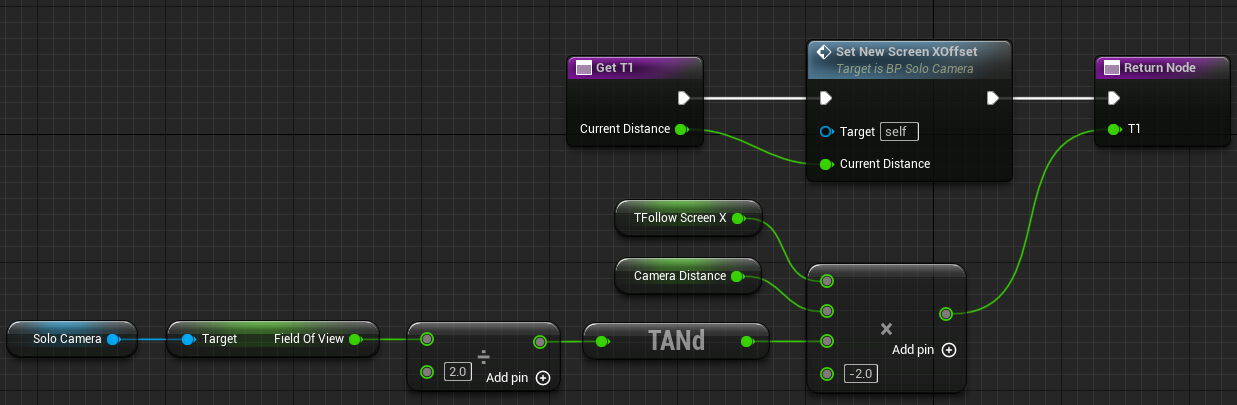
The GetT1 function computes and returns . We dynamically scale according to the current
follow-lookat distance (in the XY plane).
The GetCameraLocation sums up the three components.
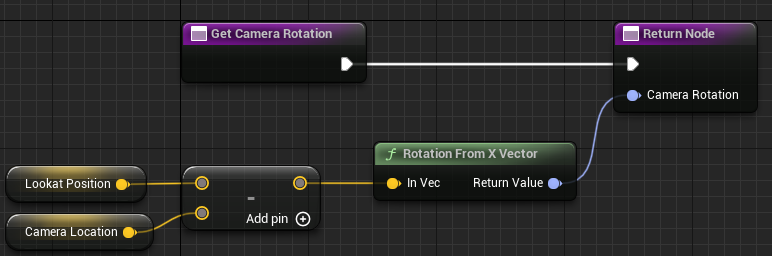
The GetCameraRotation forces the camera to orient to the
look-at target.
Finer Control Over The
Screen Space
To get a finer control of the follow point and look-at point on the
screen space, we would like to introduce three more paramters
Follow Screen Y, Lookat Screen X and
Lookat Screen Y respectively denoting the Y axis screen
position of the follow point, the X axis screen position of the lookat
point and the Y axis screen position of the lookat point. We first talk
about Follow Screen Y.
Determining
Assume is the
Y-axis offset applied to the camera, is the value of
Follow Screen Y. When , the follow point lies at the
bottom edge of the screen, and at the top edge when . Following what we do for , we can easily express as:
where
is camera's local up vector from the cross product of camera's local
forward vector
and camera's local right vector
(note again UE uses the left-hand rule). is camera's aspect
ratio (usually 16:9).
Determining new and
Going back to and
adding , we have:
Then we have:
Interestingly, the resulting by combining and remains the same as . So we do not need to change
the way we compute .
For , it's a little
tricky. First, we rewrite as , we plug it into :
This leads to (we let ). We can use the same technique
for computing to solve
. That will be:
When and with the identity
, we
have . The only
thing left is to determine the real value of and . Through experiment,
we know both signs are negative, which means the final should be .
Besides, we also introduce BeginAdaptDistanceY and
EndAdaptDistanceY, in analogy to what we do for
ScreenX, to dynamically scale when the follow point and the look-at
position is close. In this way, we achieve smooth camera move for both
ScreenX and ScreenY.
But what about the
look-at position...?
We introduce four new parameters, , the yaw angle based on camera's
local space and , and , the pitch
angle based on camera's local space and . We adjust
and (i.e., rotating camera at its own
local coordinate) to accommodate look-at position manupulation on screen
space.
Nonetheless, when biasing the look-at point on screen space, we will
encounter some problems. If we allow for camera rotation at its local
coordinate, the values of and
computed above would be wrong,
because the local orientation of camera can significantly influence the
follow position on screen space. Now that the determination of and the determination of
camera's local orientation are entangled, establishing and solving the
equation can be very difficult, particularly for an explicit
solution.
(*: There might be a nice explicit solution, but for now I won't
manage to solve it out. Perhaps for someday in the future I will take a
shot.)
What we gonna do to mitigate this issue is to increment camera
position and orientation, rather than hard-set it at its "correct"
position and orientation. This is exactly what Cinemachine does for
camera motion.
Emulate
Cinemachine by using Incremental Motion and Adding Damping
Our solution is to emulate Cinemachine in Unity through incrementally
changing camera position and rotation. This paradigm also enjoys the
benifit of adding damping easily. To increment camera motion, we only
need to calculate the desired position and rotation, and interpolate
between its current state and its desired state.
Let us go through the process by showing the blueprints.
High-level
workflow and the Initialize function
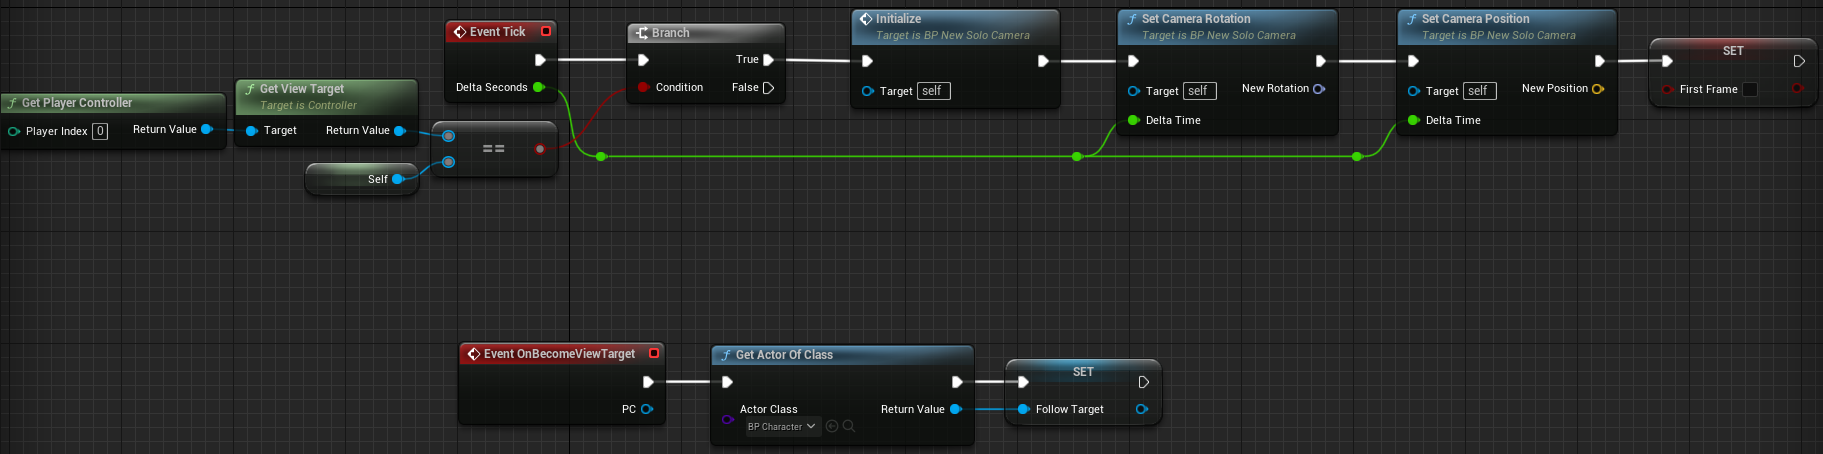
The high-level steps are pretty simple: we first determine and set
camera rotation, then set camera position. FirstFrame is a
boolean variable used to indicate whether the current tick is the first
frame during execution. If it is, no damping will be applied.
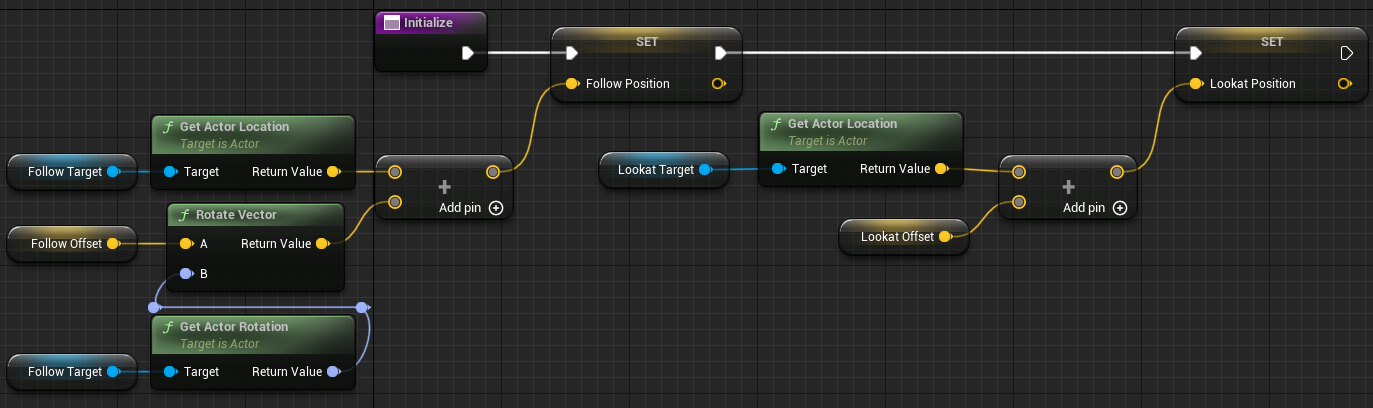
The Initialize function integrates the follow offset and
look-at offset to get the real follow position and lookat position.
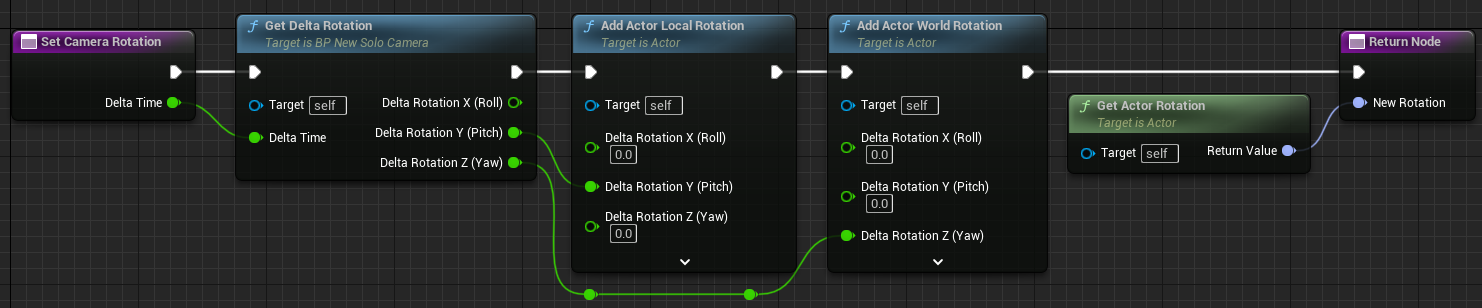
Set camera rotation
The Set Camera Rotation function gets the delta rotation
(after damping), and then rotates camera accordingly.
Similarly, the Set Camera Position function gets the
delta position (after damping), and then shifts camera in its local
reference frame, not changing camera orientation.
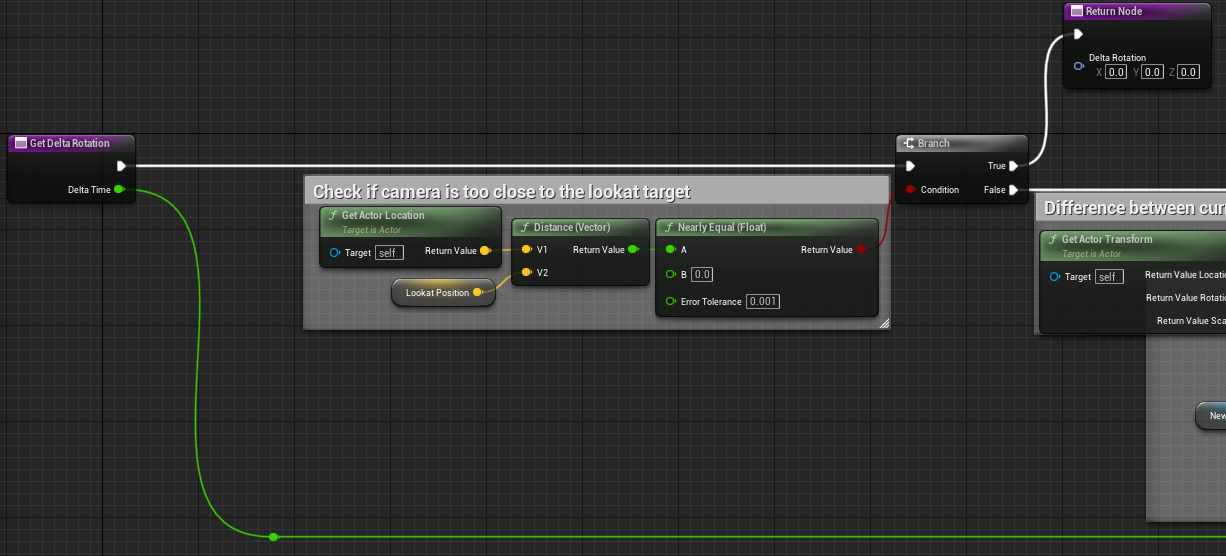
The first part of the Get Delta Rotation function
examines whether camera is too close to the look-at target. If it is the
case, the camera will not update its rotation.
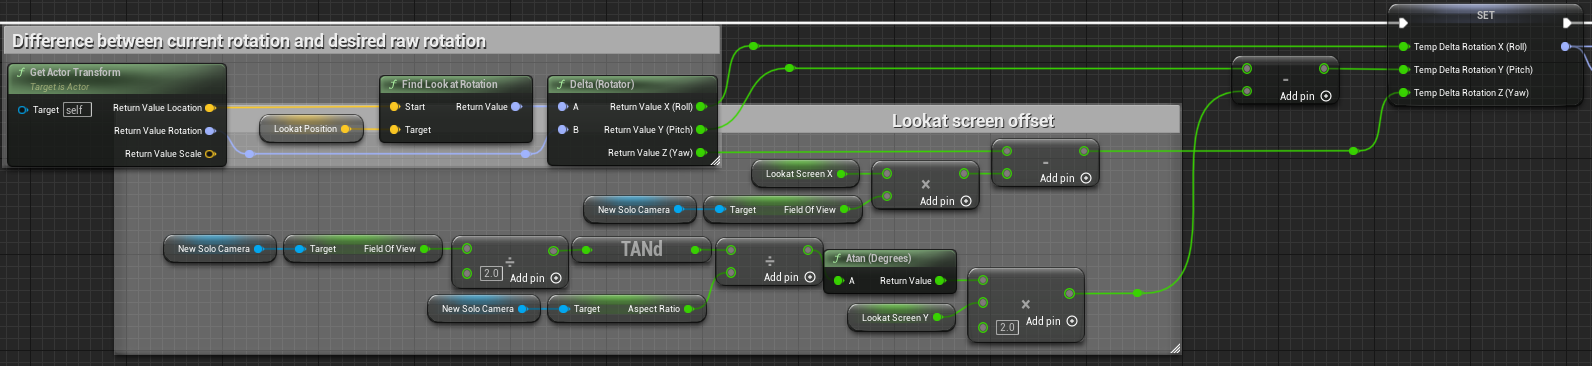
Then, the second part of Get Delta Rotation computes the
difference between current rotation and the desired rotation, taking the
given look-at screen offset into account.
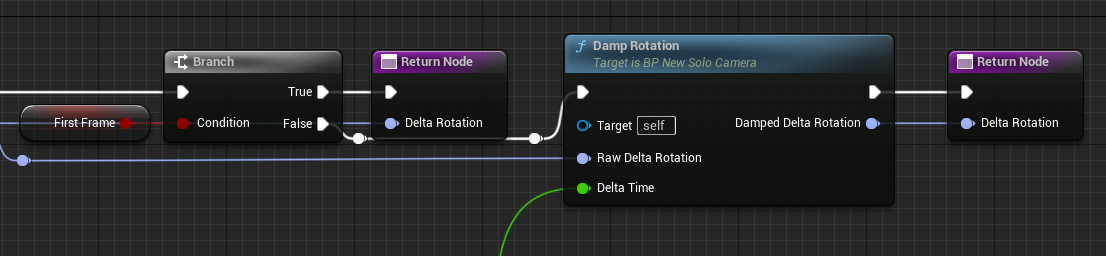
Last, the third part of Get Delta Rotation optionally
applies damping to the difference rotation and returns the damped
result.
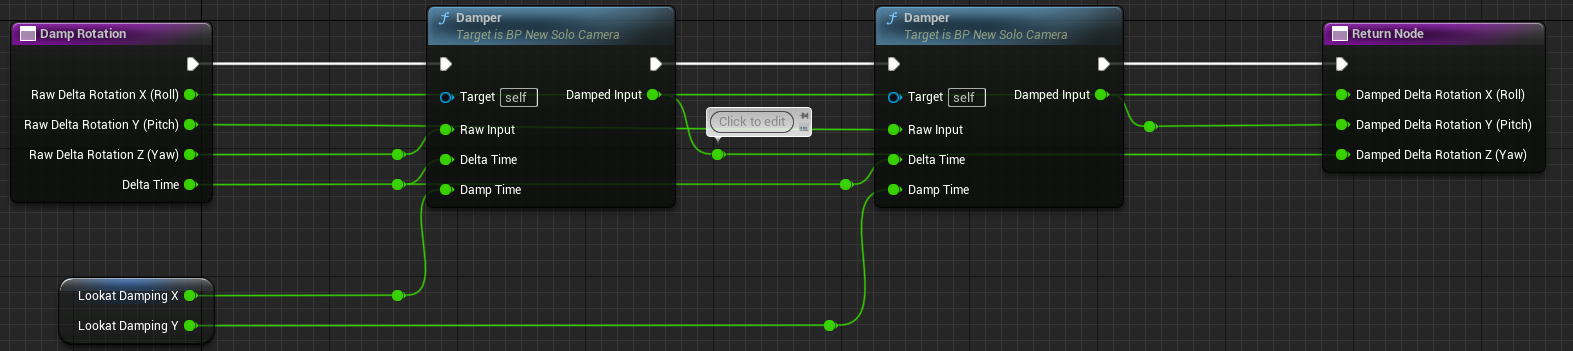
Going inside the Damp Rotation function, we find it
separately damps each of the rotation component roll, pitch and yaw, all
using the Damper function.
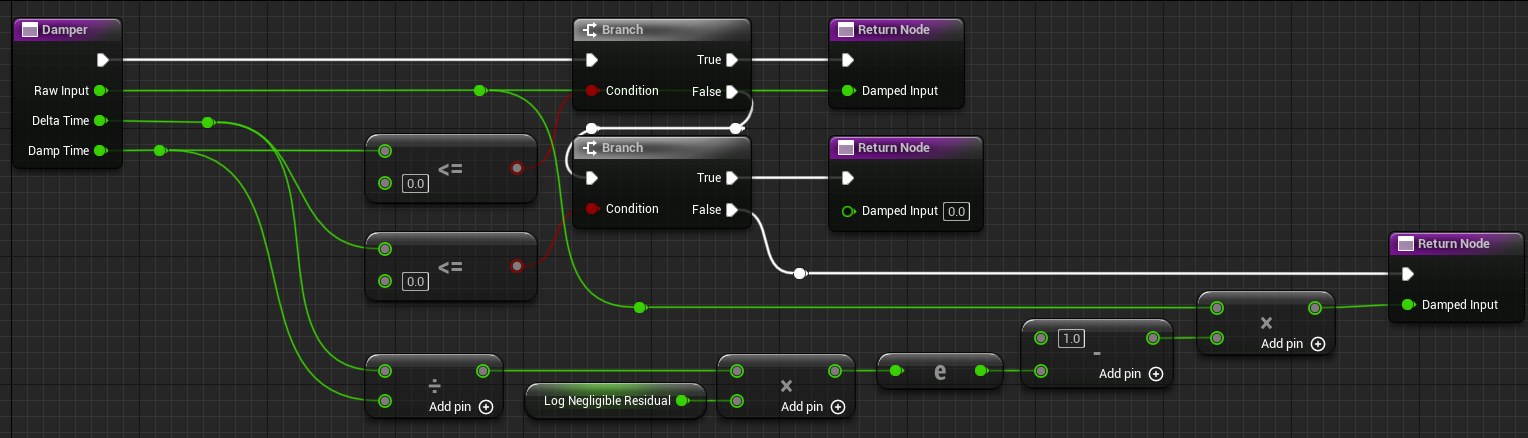
The Damper function, however, is a simple exponential
decay operator that leaves a particular negligible residual after
Damp Time. It can be formulated as:
where is the negligible
residual, say , and is the expected damp time.
Set camera position
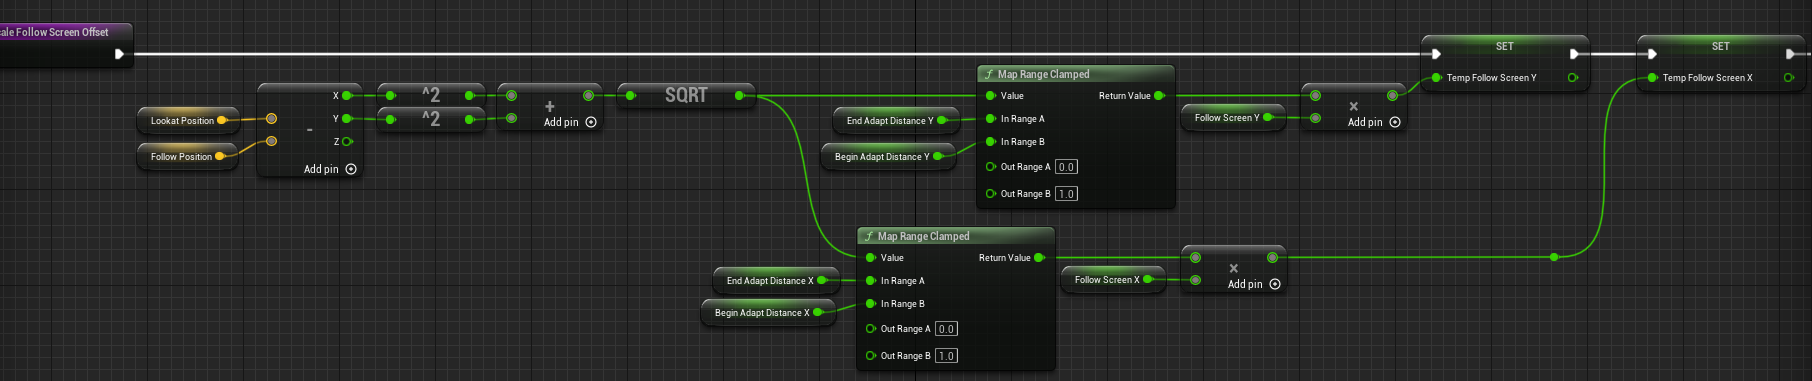
The Get Delta Position has a similar workflow. It first
computes the scaled follow screen offset. We have introduced it in the
first section (see here).
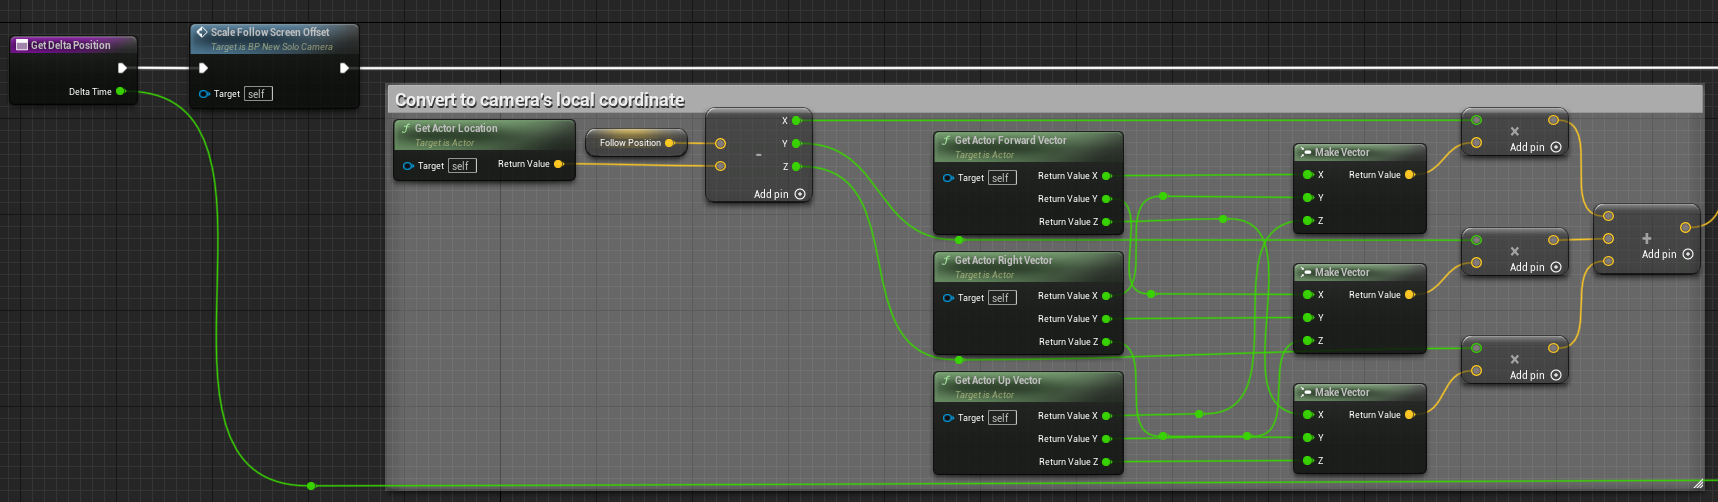
Then, it converts the follow position from world space to camera's
local space. It is a little bit relating to mathematics. Put it simply,
assume the camera's local forward vector is , right vector is and up vector is , and the world space follow
position is . The local
coordinate of would
be:
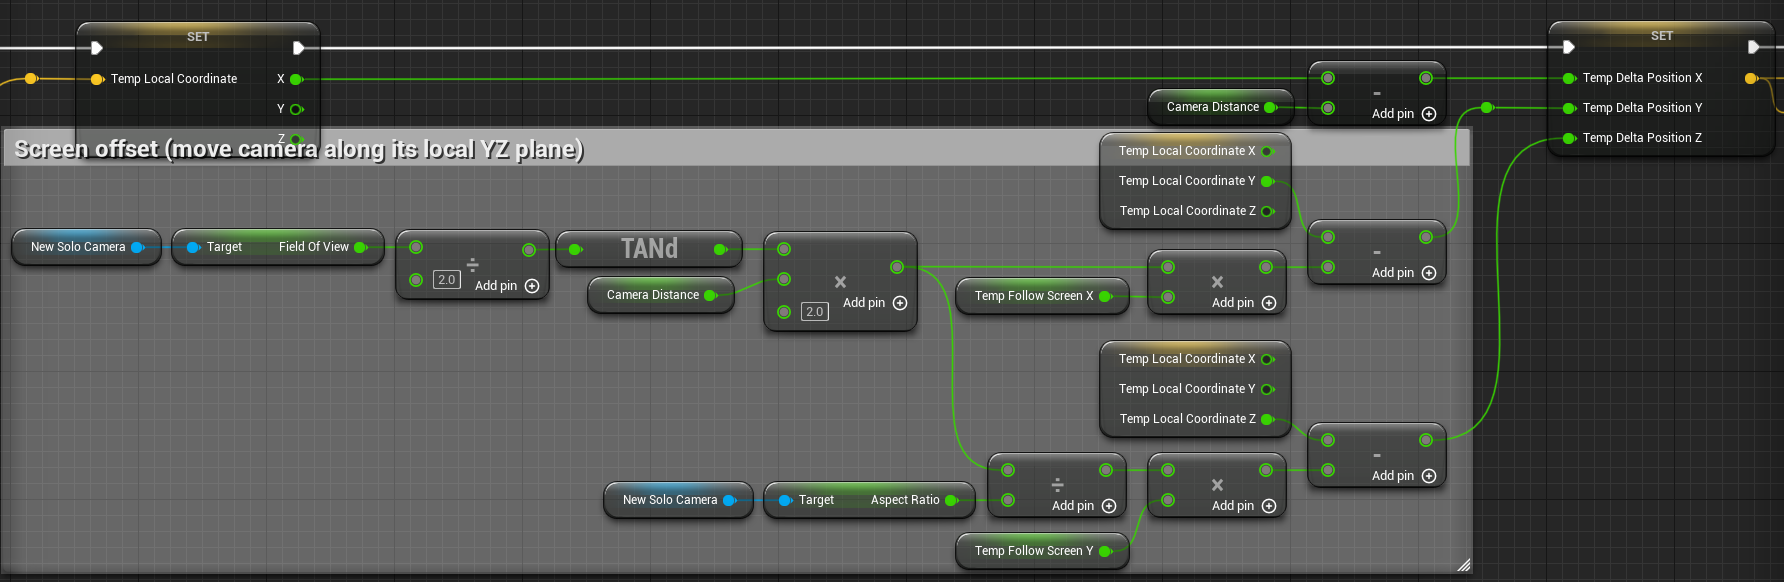
A local space coordiante facilitates computing the difference between
current camera position and desired position. Follow screen offset is
also incorporated.
Last, we damp the difference position and returns the result. The
Damp Position function manipulates three
Raw Delta Position components instead of two as we did in
Damp Rotation.
Result
OK, let us enjoy our achievements! We can freely play with various
parameters and see how the camera responses. You may notice that only
setting up the follow damping leads to camera jitter, not drastic but
still perceptible. A possible reason for this phenomenon is the unstable
tick rate on my PC. We can, of course, increase the frame rate, but a
more robust solution is to modify our damping algorithm. Rather than
directly use DeltaTime as the damping step size, we can
further split DeltaTime into several sub-delta time steps,
and simulate damping for each time step upon the last simulation,
finally having a much more smooth damping result. This is exactly what
Cinemachine does when DeltaTime is unstable.
Another potential enhancement is to add the concept of Soft
Zone, which defines a rectangular area in screen space where
follow / look-at point is allowed to move around and the rest screen
space where follow / look-at point will never show up in. In other
words, the follow / look-at position is hard restricted in the soft
zone. It provides a more flexible screen space control over our point of
interest.
(*: I've already added soft zone and the improved damping algorithm
in both blueprints and code implementation. Feel free to use and modify
as whatever you like.)
Complementary note
The improved damping algorithm is not difficult to implement. Suppose
we want to split DeltaTime into equal sub-parts, each of which is . Then the decay factor is
. The original delta amount is , and the split segment will be . The simulation progressively damps
each segment using the decay
factor .
In the first iteration, the residual is , or the actor traverses in other words. In the second iteration, the residual
will be:
This process terminates until the last -th iteration, where the final residual
will be:
Compared with the original residual without multi-step simulation
, the simulated result will almost always be larger than
the non-simulated conterpart, implying that the actor moves less within
duration . This makes the
actor behave more smooth under deltatime variability.
Code
Our last step is to code-implement the Cinemachine-like 1v1 camera
system. It is not hard but as we want a more practical, robust and
extensible camera system, we would like to organize the code in a more
systematical way. Cinemachine makes a great example (thank you,
Cinemachine).
Implementing
FramingFollow
FramingFollow is akin to Framing Transposer
in Cinemachine. Here is my simple-to-understand implementation:
TargetingAim serves the same function as
Composer in Cinemachine. It only sets the camera rotation
and keeps the aim target at a fixed position on screen. Here is the
implementation: