Recently I've been writing a new functionality for my plugin. To
facilitate its use, I want some buttons on the Details panel where these
buttons will modify the blueprint class's CDO data. The first step,
accessing the blueprint class's specific component, however is not as
simple as I thought. You cannot use the
FindComponentByClass function or its equivalents to access
the component of the blueprint class at the CDO state. The second step,
customizing the Details panel, requires me to create a new editor module
and implements the IDetailCustomization interface in a very
notoriously clumsy way. This post introduces how to customize actor's
Details panel and access its CDO components.
Step 1:
Create A New Class Implementing IDetailCustomization
According to the official
documentation, the IDetailCustomization interface can
be used for any class that lays out details for its properties or
functions.
Start by creaing a new class implementing this interface:
1
2
3
4
5
6
7
8
9
10
11
12
13
14
15
#pragma once
#include"IDetailCustomization.h"
classFMyDetail : public IDetailCustomization { public: // Used to create a singleton instance. static TSharedRef<IDetailCustomization> MakeInstance(); // Used to specifically implement your customization. virtualvoidCustomizeDetails(IDetailLayoutBuilder& DetailBuilder)override;
// If this object is currently in blueprint (CDO) if (Object->IsTemplate()) { DoSomething(ActorSequenceComponent); } // If this object is currently in level (instance). else { DoSomething(); } } return (FReply::Handled()); }) ] ]; }
#undef LOCTEXT_NAMESPACE
It is quite easy to understand the code. What I am basically doing is
first to get all customized objects and get the one I'm interested in.
Then I specify the actor's category I want to customize. Last under this
category I add a new row that includes a button with showing text "Toss
Sequence".
The most core part is the action this button executes after you click
it, defined in .OnClicked_Lambda. In my case I want to
access the UActorSequenceComponent component, so I define a
new function GetActorSequenceComponent and it returns a
UActorSequenceComponent pointer. This component is exactly
the one contained in the class's CDO. The next four lines first check
whether this object is in blueprint or in level, and then execute
different functions.
Step 2: Accessing Component
in CDO
Function GetActorSequenceComponent implements accessing
a specific component in CDO:
I don't want to dive into the details of each class and function
mentioned above. To put it simply, this function first gets the
blueprint generated class and then the
SimpleConstructionScript member which is a graph describing
the components to instantiate. Within SCS, we can visit each node and
check if it is the component of interest. Last, we return the
pointer.
Step
3: Registering the Customized Details Panel in .Build.cs
As the last step, you should register the custom class layout in the
.Build.cs file. Basically this should be within the editor
module rather than the runtime counterpart.
Register is quite simple. In your .Build.cs file, add
several lines in StartupModule() and
ShutdownModule().
1
2
3
4
5
6
7
8
9
10
11
12
13
14
15
16
17
18
19
voidFEasyCameraEditorModule::StartupModule() { auto& PropertyModule = FModuleManager::LoadModuleChecked<FPropertyEditorModule>("PropertyEditor"); PropertyModule.RegisterCustomClassLayout( // Drop all prefix such as U and A. "MyClass", FOnGetDetailCustomizationInstance::CreateStatic(&FMyDetail::MakeInstance) ); PropertyModule.NotifyCustomizationModuleChanged(); }
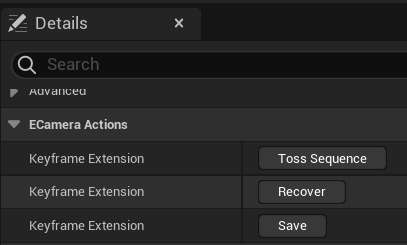
Compile and open Unreal editor. In the blueprint Details panel, you
can see three new buttons have been added (I add two more buttons). Each
button, when clicked, successfully executes its behaviour as
exptected.