The Level Sequence Integration tutorial covers one direction: playing an existing ULevelSequence (built with standard CineCameraActors) as a CCS-managed cutscene, letting the plugin handle context pushing and camera cut bridging automatically.
This tutorial covers the other direction: authoring a CCS camera inside Sequencer — the camera is a AComposableCameraLevelSequenceActor Spawnable binding, its TypeAsset's exposed parameters become keyframeable tracks, and Sequencer drives CCS-native behaviour (pivot follow, damping curves, FOV ramps, offset sweeps) frame by frame through the standard Sequencer timeline.
The two paths are complementary. If your cutscene just needs standard CineCamera motion keyframed on a Sequencer transform track, use the existing tutorial. If you want the camera to run CCS nodes (collision push, screen-space constraints, spring-damped pivots, etc.) and expose their parameters to the Sequencer timeline, use this one.
0. What we're actually building
A three-second cinematic shot where a CCS third-person-style camera dollies forward and changes FOV at a keyframed rate, driven entirely from the Sequencer timeline. Under the hood:
- The Level Sequence has a Spawnable binding for
AComposableCameraLevelSequenceActor. - The bound component references a
CT_SequencerDollyTypeAsset that exposes aDollyDistancefloat parameter and anFovOverridefloat parameter. - We add two float tracks (one for each parameter) under the binding and keyframe them.
- A CameraCut track targets the actor — Sequencer's Camera Cut machinery calls
SetViewTargeton the PCM at the section start, and CCS creates a proxy camera that relays the component's per-tick pose into the context stack. - We wrap the sequence in a Play Cutscene Sequence node so the resulting shot blends into and out of gameplay cleanly.
Prerequisites
- The Follow Camera tutorial done — you should be comfortable authoring a TypeAsset and wiring input parameters.
- The Level Sequence Integration tutorial done — you need an
AComposableCameraPlayerCameraManagerwired up and a working Play Cutscene Sequence trigger. showdebug cameraprints the expected overlay in PIE (orCCS.Debug.Panel 1for the always-on panel).
1. Author a TypeAsset with exposed parameters
The Sequencer authoring path works with any TypeAsset — you expose parameters, Sequencer keyframes them, and the component applies them to the internal camera each tick. For this tutorial we'll build a minimal dolly camera.
1a. Create the TypeAsset
Content Browser → right-click → Composable Camera System → Camera Type Asset. Name it CT_SequencerDolly.
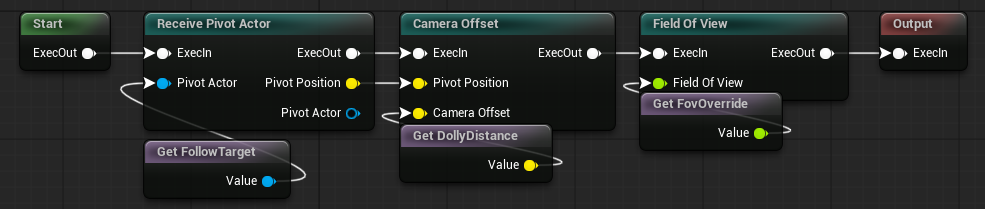
Open the graph editor. Build the following chain (all shipped nodes):
ReceivePivotActorNode
  → CameraOffsetNode         (boom arm: reads DollyDistance)
  → FieldOfViewNode          (reads FovOverride)
ReceivePivotActorNode requires a FollowTarget actor variable. In the Sequencer path the component drives the camera PCM-independently — there's no PlayerController — so FollowTarget should be set to the cinematic subject (e.g. the character actor) either as a level actor reference or via a parameter.
1b. Expose the parameters
In the Exposed Parameters panel:
| Name | Type | Notes |
|---|---|---|
DollyDistance |
Vector | Wire to CameraOffsetNode → CameraOffset |
FovOverride |
Float | Wire to FieldOfViewNode → FieldOfView |
FollowTarget |
Actor Reference | Wire to ReceivePivotActorNode → PivotActor |
Variables ... or parameters.
Actually you can also directly expose the pins (node parameters). They are also keyframeable in Sequencer.
These are what will appear as keyframeable tracks in Sequencer. FollowTarget can be set once in the Details panel and left un-keyframed; DollyDistance and FovOverride are the ones you'll animate.
Which parameters are keyframeable?
Any exposed parameter whose pin type maps cleanly to a Sequencer channel is keyframeable: Float, Double, Integer, Boolean, Vector, Rotator, Transform, and most UE structs. Actor Reference and Object Reference parameters appear in the Details panel for one-time binding but are not keyframeable by Sequencer (they show no add-key button).
Compile and save CT_SequencerDolly.
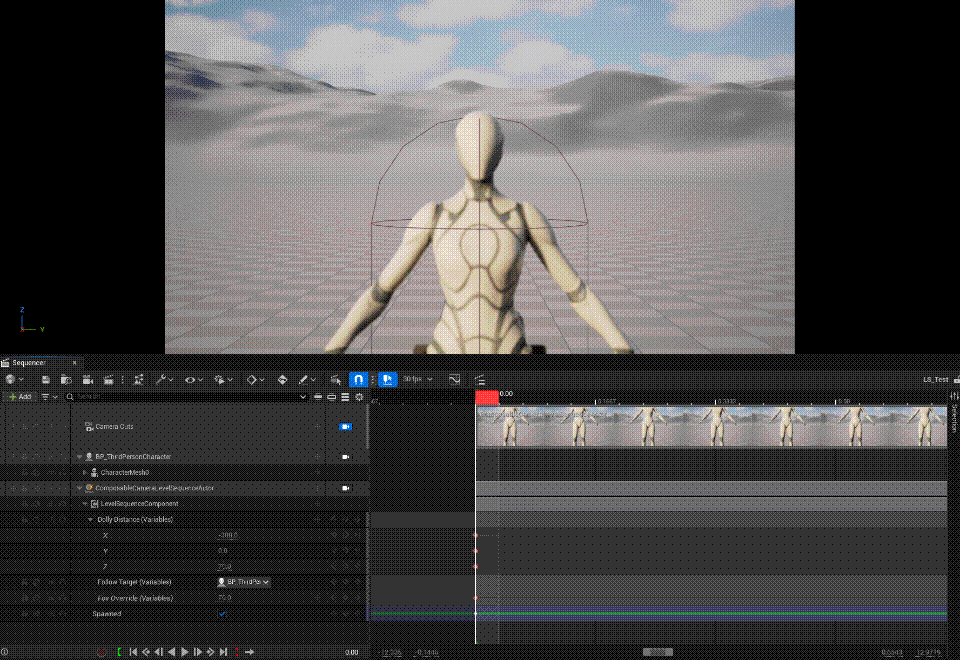
2. Add the actor as a Sequencer Spawnable
Open or create a Level Sequence in Sequencer. To add the CCS actor:
-
Search
ComposableCameraLevelSequenceActorin the Actors panels and drag it in the Sequencer. This automatically creates a Spawnable binding.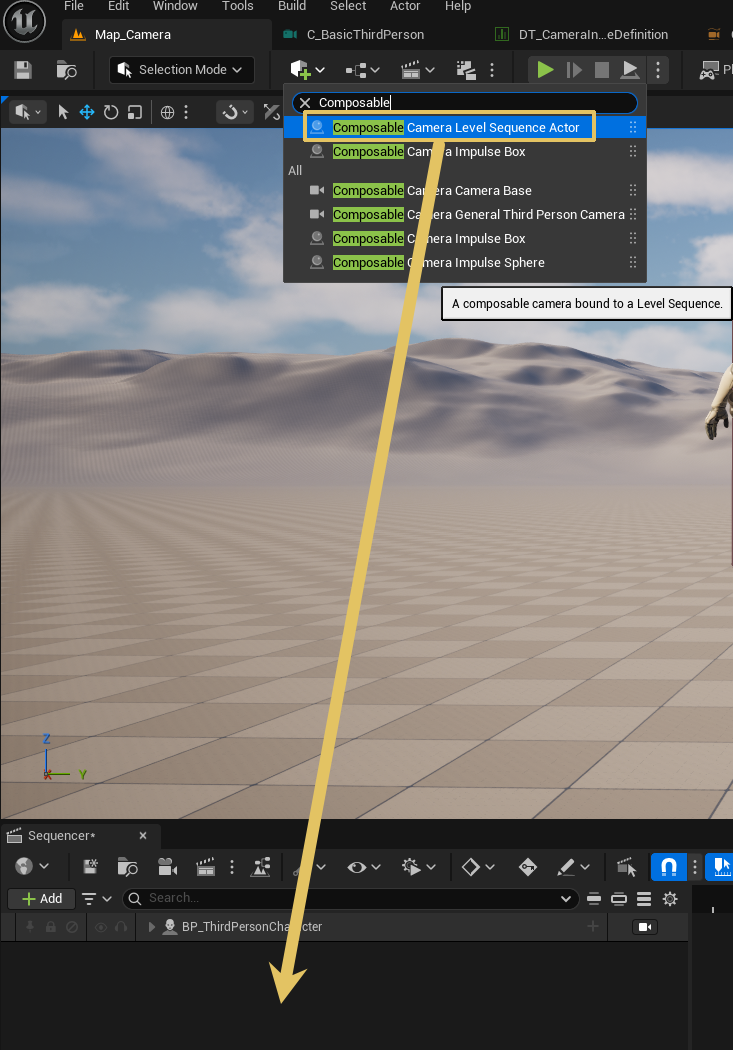
-
In the Outliner, expand the new binding. You will see:

3. Assign the TypeAsset
Click the LevelSequenceComponent row in the Sequencer Outliner. In the Details panel:
- Type Asset Reference → Type Asset — set to
CT_SequencerDolly.
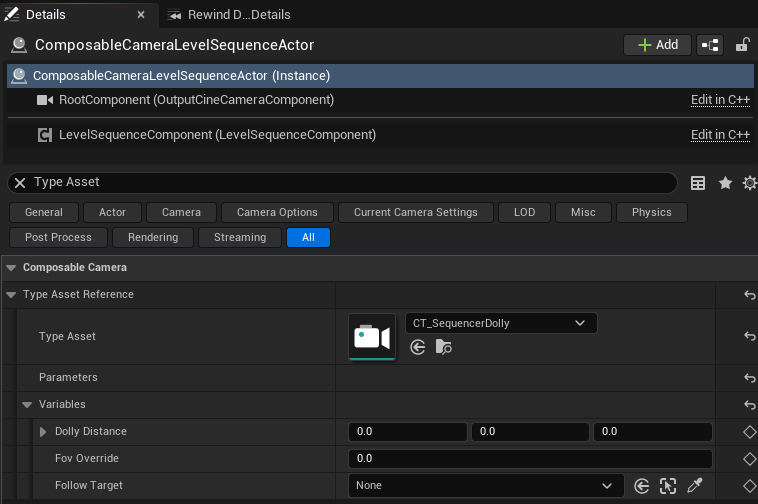
As soon as you select the TypeAsset, the component's PostEditChangeProperty fires RebuildBagsFromTypeAsset. The two parameter bags (Parameters and Variables) are now populated with typed properties matching DollyDistance, FovOverride, and FollowTarget.
4. Add a CameraCut section
Before adding parameter tracks, wire the CameraCut:
- In the Sequencer Outliner, right-click → Add Track → Camera Cut Track (if no Camera Cut Track exists yet).
- In the Camera Cut Track, click + Camera and pick the
AComposableCameraLevelSequenceActorbinding. - Drag the section to cover the full sequence range (or just the portion you want this camera active).
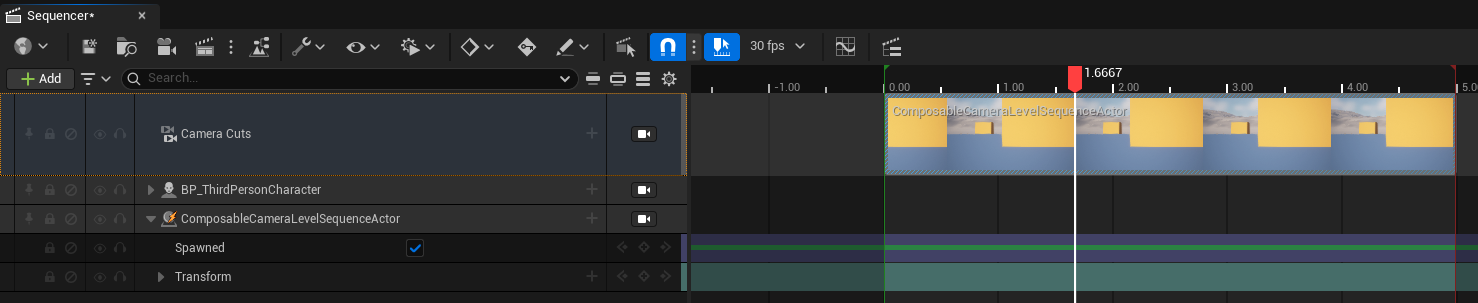
The CameraCut track is what tells the engine — and CCS — which camera is active at each frame. When playback reaches the section start, Sequencer fires SetViewTarget on the PCM using the bound actor. Because AComposableCameraLevelSequenceActor has a UCineCameraComponent as its root, the PCM's SetViewTarget recognizes it on the same fast path as a standard ACineCameraActor, creates a transient proxy camera, and activates it in the CCS context.
Key Spawn Tracks from Camera Cuts
For Spawnable CCS actors, use Tools -> Composable Camera System -> Key Spawn Tracks From Camera Cuts after the Camera Cut track is laid out. The tool reads the focused Level Sequence's Camera Cut sections, finds spawnable AComposableCameraLevelSequenceActor bindings, and rebuilds each actor's Spawn Track so the actor exists only across the cut ranges that target it.
The same action is available as the editor console command:
CCS.Editor.KeySpawnTracksFromCameraCutsThis is now the preferred lifetime model for CCS Sequencer cameras. While the actor exists, its Level Sequence component evaluates; when the Spawn Track disables it, the component and its transient internal camera are torn down with the spawned actor.
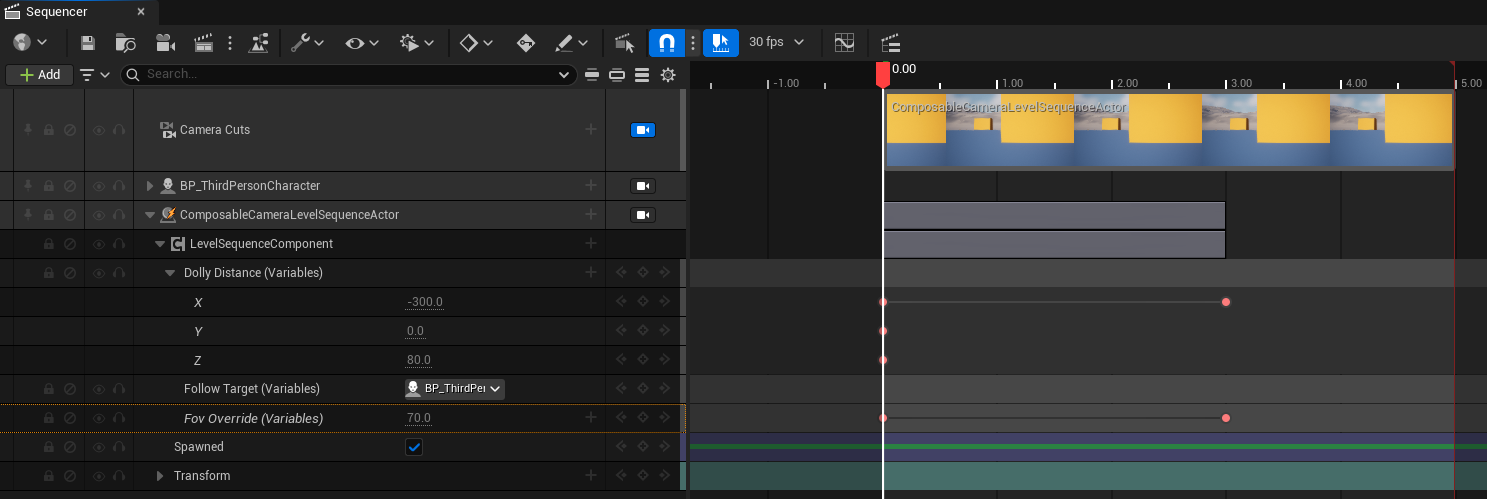
5. Add and keyframe parameter tracks
Now add keyframeable tracks for DollyDistance and FovOverride:
-
Right click + Track on the
ComposableCameraLevelSequenceActor→LevelSequenceComponent.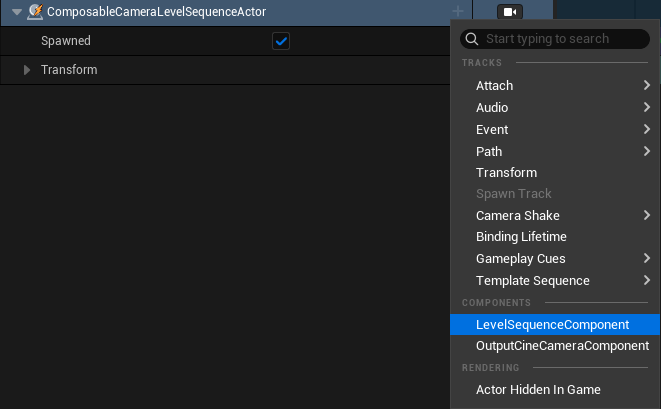
-
In the Sequencer Outliner, expand the
LevelSequenceComponentrow. -
Click + Track (the small
+next to the component row) → Camera Parameters → DollyDistance. A float track appears.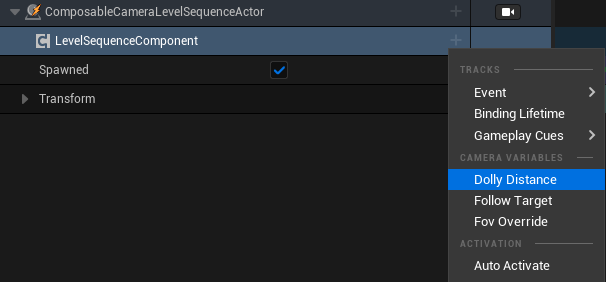
-
Repeat for Camera Parameters → FovOverride/FollowTarget.
- Bind your character to FollowTarget.
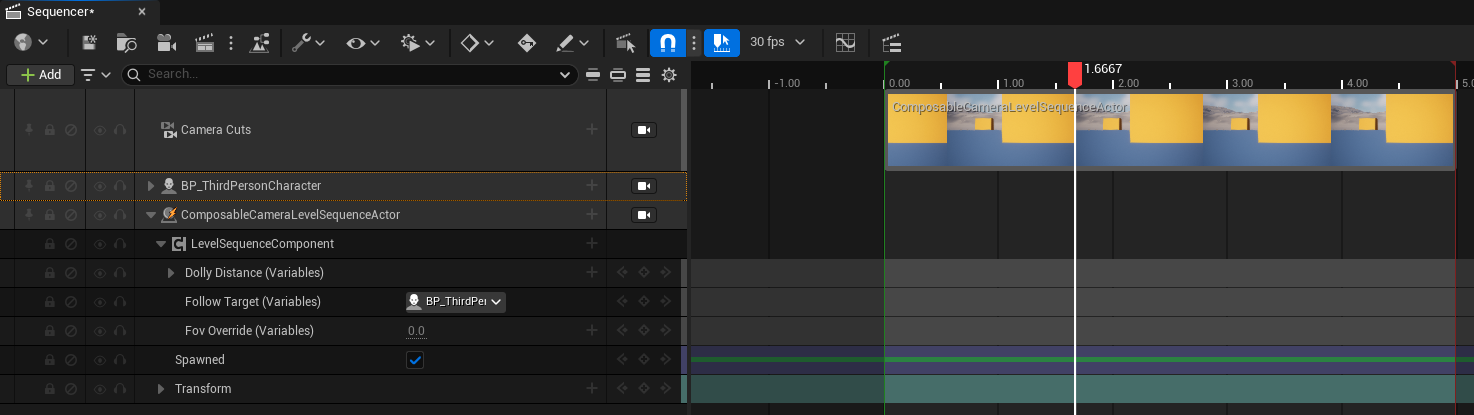
With the tracks added, keyframe them:
| Time | DollyDistance | FovOverride |
|---|---|---|
| 0:00 | (-300, 0, 75) | 70 |
| 0:03 | (-150, 0, 75) | 55 |
A medium close-up: the camera dollies forward 150 units while the FOV tightens from 70° to 55°.
To keyframe: move the playhead to 0:00, expand the float track, right-click the value field → Add Key. Move to 0:05, change the value, add another key. Set the interpolation to Auto (cubic) for a natural ease-in / ease-out feel.
No keyframe button visible?
If the Add Key button is greyed out or absent, the parameter's pin type may not map to a Sequencer channel. Check the pin type of DollyDistance in the TypeAsset — only Float / Double / Vector / Rotator parameters produce keyframeable tracks. If it's a custom struct, it won't appear here.
6. Play through the sequence from Blueprint
If you want this sequence to play as a proper CCS cutscene (with enter/exit transitions, context push, and gameplay camera live underneath), wire it into the same Play Cutscene Sequence node from the Level Sequence Integration tutorial:
On Trigger Overlap Begin
  └─> Play Cutscene Sequence
        Level Sequence:      LS_DollyIntro
        Context Name:        Cutscene
        Enter Transition:    InertializedTransition (0.5s)
The flow is identical to the existing tutorial:
Play Cutscene Sequencepushes aCutscenecontext onto the CCS stack.- Sequencer starts playback. When the CameraCut section begins,
SetViewTargetfires on the PCM with theAComposableCameraLevelSequenceActor. - The PCM creates a proxy camera in the cutscene context. From this point the component's
TickComponentruns the TypeAsset's node chain each frame, applies the current keyframed parameter values, and projects the resulting pose onto the CineCamera. The proxy relays that pose to the context stack. - The parameter tracks animate
DollyDistanceandFovOverrideeach frame. - The sequence ends → the cutscene context pops → inter-context transition back to gameplay.
Piloting in the editor (no Blueprint required)
During authoring you can preview directly in Sequencer without wiring Blueprint:
- Open the sequence in Sequencer.
- In the Sequencer toolbar, enable Camera Lock (the camera icon) and select the
AComposableCameraLevelSequenceActorbinding. - Scrub the timeline. The viewport updates in real time — the CCS node chain runs, the TypeAsset parameters animate, and you see the final CCS pose, including any collision response or screen-space constraints baked into the TypeAsset.
This is the fastest iteration loop for tuning the keyframe values.
Keying from the active viewport
Two Level Editor shortcuts help block out CCS Sequencer camera transforms:
| Shortcut | Menu command | Result |
|---|---|---|
Ctrl+Alt+C |
Tools -> Composable Camera System -> Copy Viewport Camera Transform | Copies the active Level Editor viewport camera as pasteable FTransform text. |
Ctrl+Alt+K |
Tools -> Composable Camera System -> Key Viewport Camera Transform | Keys the active viewport camera transform onto selected CCS Level Sequence Transform tracks at the current Sequencer frame. |
For keying, select the CCS actor binding, its Transform track, a transform section, or a transform key area in Sequencer. The command only writes to transform tracks that belong to a AComposableCameraLevelSequenceActor, its component binding, or descendants.
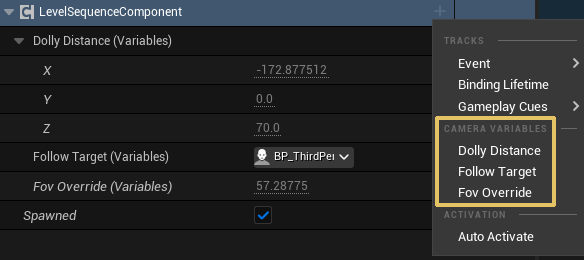
7. Variables vs Parameters
The TypeAsset can expose both Parameters and Variables. In the Sequencer path they show up as separate track groups:
- Camera Parameters tracks drive
TypeAssetReference.Parameters— these match the TypeAsset's Exposed Parameters list. - Camera Variables tracks drive
TypeAssetReference.Variables— these match the TypeAsset's Exposed Variables list.
Mechanically the distinction is the same as in the runtime activation path: parameters are injected before Initialize() and can't be modified by nodes; variables are read-write throughout the frame and nodes can publish to them. For Sequencer use, prefer Parameters for authoring-time inputs (distances, angles, FOVs) and reserve Variables for values you want to both keyframe and read back out of the camera during evaluation.
Common pitfalls
- Actor doesn't appear in the class picker. Search for "Composable Camera Level Sequence Actor" — the display name. The actor is placeable and can also be used as a Sequencer Spawnable or Possessable; if it is missing, confirm the plugin's editor module is loaded and the sequence is not filtering the class picker.
- No parameter tracks show up under the component. The TypeAsset isn't set yet, or the TypeAsset has no Exposed Parameters. Open the TypeAsset and verify that the parameters are listed in the Exposed Parameters panel and compiled.
- Camera Cut Track doesn't see the actor. Make sure the CameraCut section references the Spawnable binding (not a level-placed actor). Right-click the CameraCut section → Set Camera and confirm the binding name matches.
- Parameter keyframes have no effect at runtime. The per-frame parameter application is done in
TickComponentviaApplyParameterBlock. The component evaluates while its owning Spawnable exists. Confirm the Spawn Track keeps the actor spawned across the keyframed range, or run Key Spawn Tracks From Camera Cuts after changing Camera Cut timing. - Camera snaps at CameraCut boundary instead of blending. Supply an
Enter Transitionto Play Cutscene Sequence, or set a default Enter Transition on theCT_SequencerDollyTypeAsset. The CCS proxy-camera activation goes through the same transition resolution chain as any other camera activation. FollowTargetresolves to null at runtime. The actor reference set in the Details panel binds to a level actor. If the sequence is played in a level that doesn't contain that actor (e.g. a streaming sub-level that hasn't loaded), the reference will be null andReceivePivotActorNodewill output the unmodified input pose. Use Sequencer's Object Reference Binding system or set the parameter from Blueprint with a live actor reference instead.- Physical optics (focal length, aperture) aren't affected by the TypeAsset. The component writes position and rotation only — physical optics stay on the CineCamera and are controlled by Sequencer's standard camera component property tracks (
Camera Component → Current Focal Length, etc.). Wire those tracks alongside your CCS parameter tracks.
Where next
- Level Sequence Integration — the complementary tutorial: playing a standard LS with
CineCameraActorsthrough the CCS cutscene system. - Shot-Based Keyframing in Sequencer — author Shot Sections that solve framing from targets instead of keyframing camera parameters directly.
- Node Catalog → PostProcessNode — add a
PostProcessNodeto the TypeAsset to keyframe bloom, depth-of-field, or color grading through the same parameter track mechanism. - Concepts → Context Stack — the full model for how the cutscene context and inter-context transitions work.
- C++ API → AComposableCameraLevelSequenceActor — class reference for the Spawnable actor.
- C++ API → UComposableCameraLevelSequenceComponent — component reference, including
SetEvaluationEnabled