Push a Cutscene context during a scripted moment, run a cinematic camera inside it, then pop back to the gameplay camera — with a clean blend in both directions, and the gameplay camera kept live under the cutscene the whole time so the return blend is seamless rather than a snap-back to a stale pose.
This tutorial assumes you already have a gameplay camera running (the Follow Camera tutorial produces one). If you don't, either finish that tutorial first or use any camera you've authored — the specifics of the gameplay camera don't matter for this walkthrough.
0. What we're actually building
From the player's perspective: they walk up to a door trigger, the world fades into a scripted shot that orbits around a statue for three seconds, then the shot blends back to their third-person gameplay camera — which has been tracking them the entire time, so when control returns, the camera is already exactly where it should be.
From the system's perspective:
- At
BeginPlay, the PCM creates aGameplaycontext and activates the follow camera in it. - The trigger calls
Activate CamerawithContext Name = Cutscene. BecauseCutsceneisn't on the stack yet, activation auto-pushes it onto the top — there is no separatePushCameraContextfunction, pushing is implicit in activation. - The PCM installs a reference leaf node pointing at the gameplay context's director inside the
Cutscenedirector's evaluation tree. That means while the cutscene is running, the gameplay tree is still being evaluated live on each frame. - A timer fires
TerminateCurrentCamera(orPopCameraContext("Cutscene")), which triggers an inter-context transition back to gameplay.
You don't author steps 1, 3, or the transition plumbing — the PCM does that. You author steps 2 and 4, plus the cutscene camera itself.
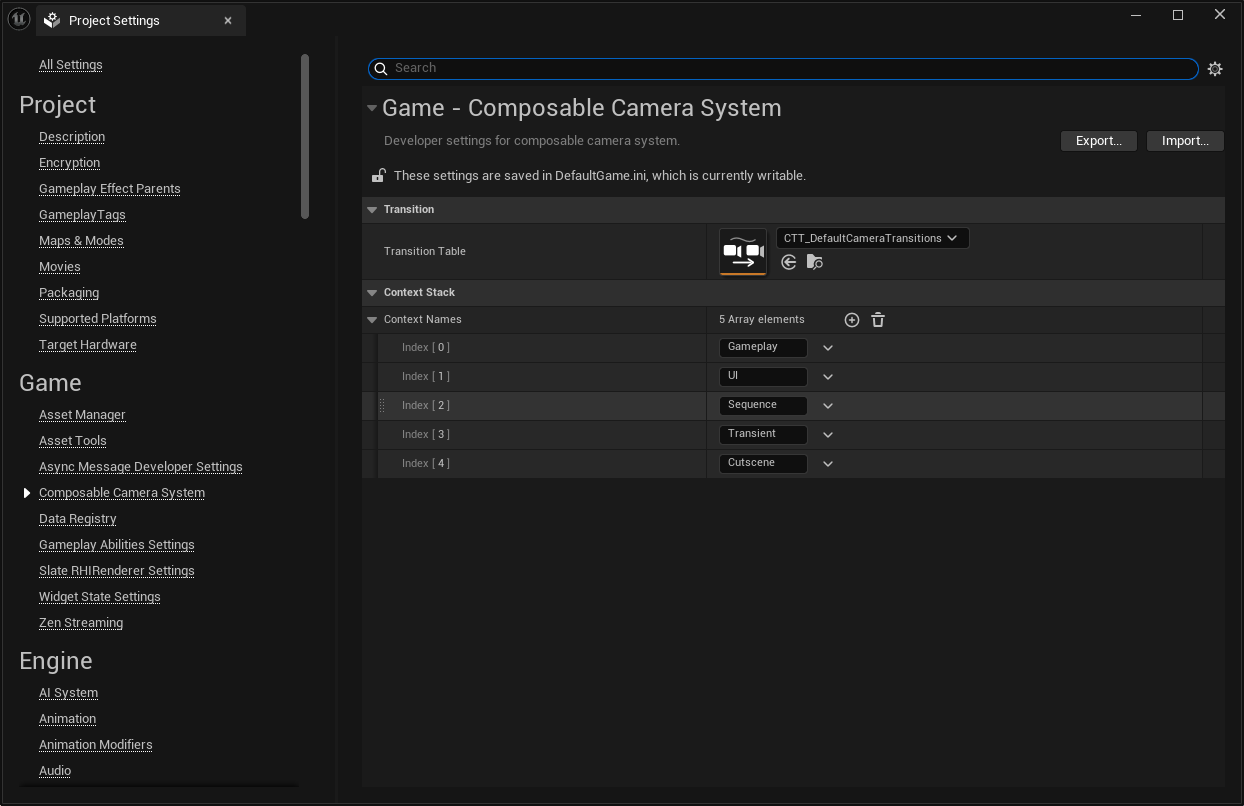
1. Declare the Cutscene context name
Project Settings → ComposableCameraSystem → Context Names. This is an ordered list of FNames. If it doesn't already contain Cutscene, add it:
Context Names
  - Gameplay        (base context — always index 0)
  - Cutscene
  - UI              (if you have one; not used here)
Context names must be declared up front — you cannot push a context whose name isn't in this list.
2. Author the cinematic camera
The cinematic shot for this tutorial is a simple rail orbit — camera rides a spline around the statue, looks at the statue the whole time. We'll reuse the shipped nodes.
Content Browser → right-click → Composable Camera System → Camera Type Asset. Name it CT_StatueOrbit.
In the graph editor:
- Declare one parameter:
FocusActor(Actor Reference) — the statue. - Drop a Spline node. In Details, set
SplineType= BuiltInSpline, and assign aUSplineComponent-carrying actor (aBP_OrbitRailyou've placed near the statue in the level). Or you can expose thisRailpin so that callers can provide a Rail actor. SetDuration=3.0so it completes the orbit in 3 seconds. - Drop a LookAt node after it.
LookAtType= By Actor, wireFocusActorintoTargetActor,ConstraintType= Hard (the cutscene fully owns rotation — no player input). - Drop a FieldOfView node.
FieldOfView=45for a tighter cinematic lens. - Wire the last node's output into the Output node.
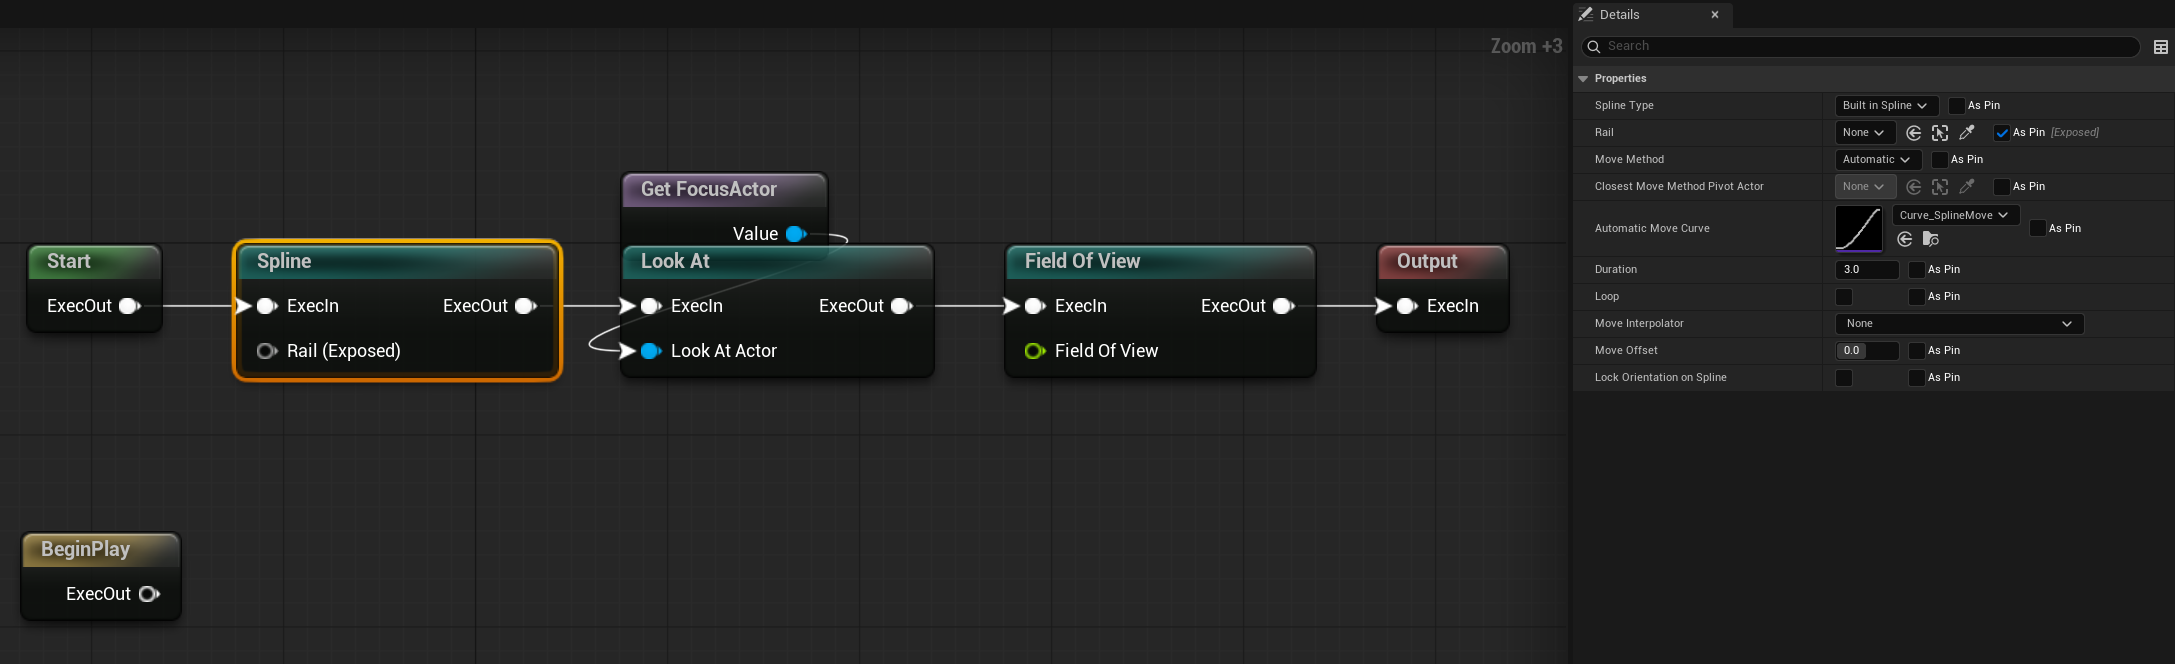
Save.
3. Author a gentle enter transition on CT_StatueOrbit
Open CT_StatueOrbit and scroll the Details panel to Transitions. Set:
EnterTransition= a newInertializedTransitioninstance (instanced subobject).TransitionTime= 1ExitTransition= another newInertializedTransition.TransitionTime=1.
These are fallbacks — they'll be used whenever nothing else wins the five-tier resolution chain. For this tutorial they're enough; in production you'd typically route specific (Source, Target) pairs through the transition table.
Why inertialized
The gameplay camera is moving when the cutscene pushes — the player was presumably walking into the trigger. A velocity-aware blend (inertialized) avoids the kink that a linear blend would produce at t=0 by matching the source's momentum. See Transitions → InitParams.
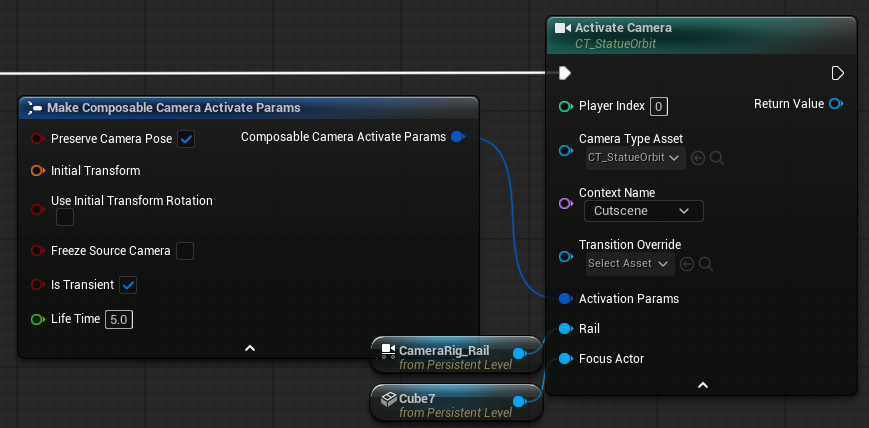
4. Trigger the activation (which auto-pushes the context)
This is a Blueprint call. Find or create a trigger actor with a BoxComponent for the scripted zone. In its OnComponentBeginOverlap:
- Cast the overlapping actor to your player character; bail if the cast fails.
- Get the statue actor reference (level-placed
BP_Statue). - Drop an Activate Camera node from the palette. Wire:
Player Index=0Camera Type=CT_StatueOrbitContext Name=Cutscene(dropdown — sourced from Project Settings)Transition Override= leave empty (we'll let the type asset'sEnterTransitiondrive it)Activatio Params=Preserve Camera Pose = true,IsTransient = true,Life Time = 3.Rail= The spline on which the camera will move on.Focus Actor= the statue reference. (This pin appears because of the context parameter you declared on the type asset.)
That's it — there is no separate "Push Camera Context" node. The PCM handles the push implicitly:
EnsureContext("Cutscene")adds or moves-to-top theCutscenecontext.- Activates
CT_StatueOrbitin that context. - Resolves the enter transition — tier 4 of the resolution chain picks up
CT_StatueOrbit.EnterTransition(the 0.8s inertialized blend you authored), because nothing higher-priority (caller override, transition table, source's exit transition) is set.
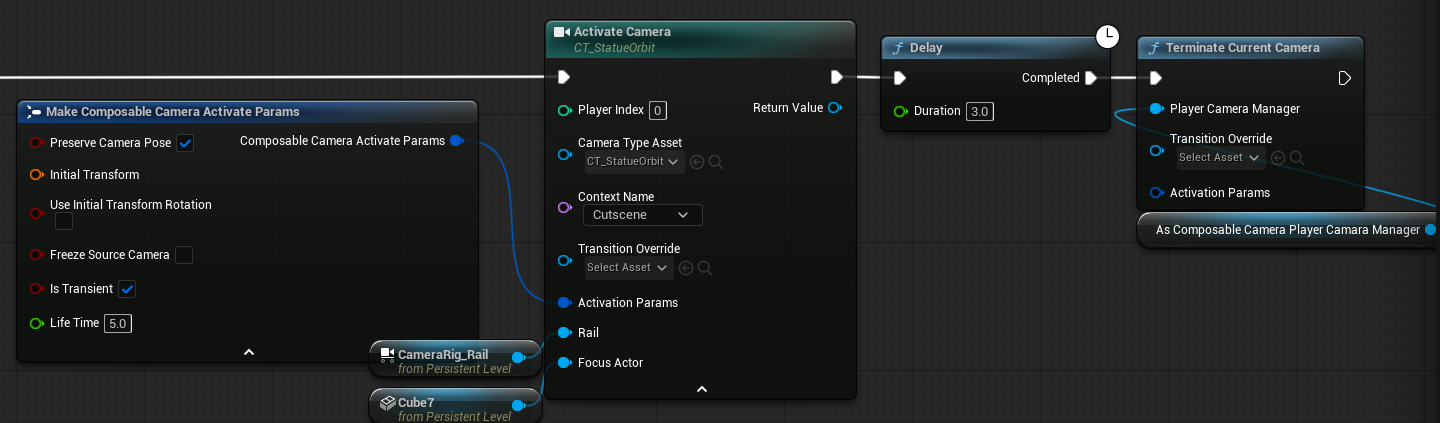
5. Trigger the pop
For this tutorial, just fire the pop on a timer three seconds in. In the same trigger Blueprint, right after the Activate Camera call:
- Drop a Delay node.
Duration=3.0. - Drop a Get Composable Camera Player Camera Manager node.
Index=0. Store its return value. - Drop a Terminate Current Camera node. Wire the PCM reference into its
Player Camera Managerpin. LeaveTransition Overrideempty.
Terminate vs PopCameraContext
TerminateCurrentCamera always pops the current top context — clean and typical for "end this cutscene now" gameplay. PopCameraContext(Name) is more targeted: it pops a specific context whether it's on top or buried. If buried, it's removed with no transition (there was no blend to perform); if on top, it behaves like Terminate. For this tutorial either works.
When the pop fires, the PCM:
- Consults
CT_StatueOrbit.ExitTransition(tier 3) if it's set — in this case it is (0.6s inertialized). - Installs an inter-context blend: a new transition wrapping live reference leaves on both sides — the outgoing
Cutscenedirector on the left, the gameplay director (which has been running the whole time) on the right. - As the blend proceeds, both directors keep evaluating. The player sees the orbit camera smoothly hand off to the gameplay camera tracking the character's current position and facing.
This is the payoff of keeping the gameplay tree live under the cutscene: when control returns, the follow camera is already where it should be. No catch-up frame, no snap.
6. Play
Walk your character into the trigger. You should see:
- A smooth inertialized blend from the follow camera into the orbit.
- Three seconds of rail-driven cinematic.
- A smooth inertialized blend back to the follow camera, tracking your character's current position.
The in-game overlay (showdebug camera) or the Debug Panel's Context Stack & Evaluation Tree region (CCS.Debug.Panel 1) during the cutscene should show:
- Context Stack top:
Cutscene - Full stack:
Gameplay, Cutscene - Active tree:
CT_StatueOrbitleaf + a reference-leaf pointer toGameplay/CT_ThirdPersonFollow
Common pitfalls
- Context name not found — you forgot step 1. The push silently no-ops (or errors to
LogComposableCameraSystem, depending on project settings). Double-check Project Settings → Context Names containsCutscene. - Cutscene snaps in, no blend —
CT_StatueOrbit.EnterTransitionis null, and nothing else supplied a transition. Either set the enter transition as in step 3, or pass a caller override via theTransition Overridepin onActivate Camera. - Pop-back snaps to a stale gameplay pose — this should not happen with the shipped system, because the gameplay tree is kept live. If it does, you're probably pausing ticks on the gameplay camera somewhere (e.g.
SetActorTickEnabled(false)on the player during cutscene). Let it tick. - Player input still rotates the cutscene camera —
LookAtNode.ConstraintTypeis Soft, which lets the player override the look direction. Set it to Hard for cutscene use, or removeControlRotateNodefrom the cutscene camera entirely. - Cutscene activates but doesn't auto-pop — transient cameras auto-pop on termination (see Context Stack → transient cameras), but your cutscene camera isn't transient. Either set
bIsTransient = trueon the activation params (losing modifier support in exchange), or callPopCameraContextexplicitly as we did.
Where next
- Custom Transitions — authoring a bespoke blend shape (includes a worked bounce-and-settle example) and wiring it into the transition table for a specific
(gameplay, cutscene)pair. - Transitions & Blending — the full authoring guide for enter/exit transitions and the transition table.
- Context Stack — the deep concept page, including th