Push an aim-down-sights camera when the player holds the aim button — tighter boom, lower FOV, slower input — then pop back to the gameplay camera on release. Both directions blend smoothly via inertialized transitions.
This tutorial assumes you have a gameplay camera running (the Follow Camera tutorial produces one). The aim camera sits in its own context, so activating it doesn't destroy the gameplay camera underneath — it suspends it, exactly like the Cutscene Context tutorial, but driven by a held input instead of a trigger overlap.
0. What we're actually building
From the player's perspective: they hold the aim button, the camera tightens over the right shoulder and zooms in, and when they release, the view eases back to the normal follow distance. The transition is smooth in both directions — no snapping, no pop.
From the system's perspective:
- At
BeginPlay, the PCM creates aGameplaycontext and activates the follow camera in it (same as the Follow Camera tutorial). - On aim-button press, gameplay code calls
Activate CamerawithContext Name = Aim. BecauseAimisn't on the stack yet, activation auto-pushes it. - The PCM installs a reference leaf pointing at the gameplay director, so the gameplay camera keeps evaluating live under the aim camera.
- On aim-button release, gameplay code calls
TerminateCurrentCamera. The stack pops back toGameplaywith an inertialized transition.
You author steps 2 and 4, plus the aim camera type asset. The PCM handles the rest.
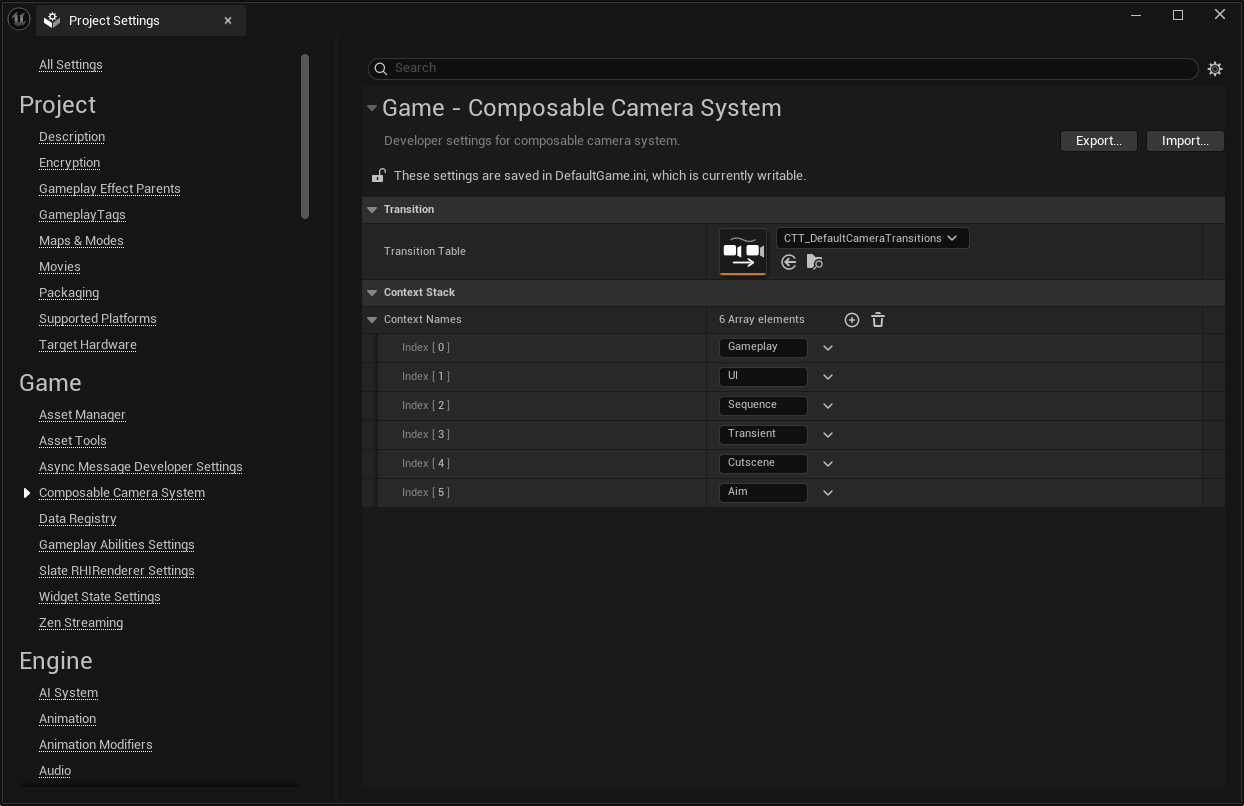
1. Declare the Aim context name
Project Settings → ComposableCameraSystem → Context Names. Add Aim if it isn't already there:
Context Names
  - Gameplay        (base context — always index 0)
  - Aim
  - Cutscene        (from the Cutscene tutorial, if you did it)
Context names must be declared up front — you cannot push a context whose name isn't in this list.
2. Author the aim camera type asset
Content Browser → right-click → Composable Camera System → Camera Type Asset. Name it CT_AimDownSights.
The node chain
The aim camera follows the same structural pattern as the gameplay camera — pivot on target, offset, rotation, collision — but with tighter values:
ReceivePivotActorNode     reads FollowTarget, publishes PivotPosition
  → ControlRotateNode     same input, but slower sensitivity
  → PivotOffsetNode       closer shoulder offset
  → CameraOffsetNode      shorter boom
  → CollisionPushNode     collision still needed
  → FieldOfViewNode       zoomed FOV
Drop these nodes in the graph editor and wire the exec chain from Start through to Output.

Parameter values
| Node | Property | Gameplay camera | Aim camera | Why |
|---|---|---|---|---|
| PivotOffset | Offset |
(0, 0, 80) |
(0, 0, 70) |
Tighter to the right shoulder — the "over-the-shoulder" ADS feel |
| CameraOffset | Offset |
(-400, 50, 100) |
(-80, 20, 0) |
Shorter boom — closer to the character |
| ControlRotate | HorizontalSpeed |
1 |
0.75 |
Slower yaw during aim — precision aiming |
| ControlRotate | VerticalSpeed |
1 |
0.75 |
Slower pitch too |
| FieldOfView | FieldOfView |
79 |
65 |
Zoomed in — the "scope" feel |
Adjust these to taste. The key design principle is that the aim camera is the same structural composition as the gameplay camera but with tighter, slower, more focused parameters.
Expose FollowTarget
Expose the ReceivePivotActorNode's Actor pin as a camera parameter named FollowTarget, and mark it as Required. This is the same parameter name the gameplay camera uses — keeping it consistent means the activation call looks the same.
Wire the FollowTarget parameter into ControlRotateNode's RotationInputActor pin as well (the aim camera still reads input from the same actor).
Set the enter transition
In the type asset's Details panel (click empty canvas to deselect all nodes), set:
EnterTransition= a newInertializedTransitioninstance,TransitionDuration = 0.2. Short and snappy — ADS should feel responsive.
The exit transition (used when popping back to gameplay) falls back to the gameplay camera's own EnterTransition via the five-tier resolution chain. If you want a different duration for the pop-out, set ExitTransition on CT_AimDownSights as well (this is tier 3 in the chain and takes precedence over the gameplay camera's enter).
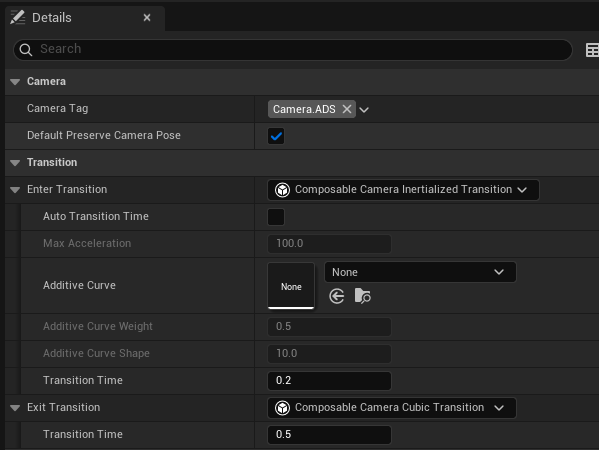
Tag the camera
In the Details panel, set CameraTag to Gameplay.ADS (or a tag that makes sense for your project). This lets modifiers target this camera specifically — for example, a weapon-specific FOV modifier that only applies during ADS.
Save the asset.
3. Wire up aim input in Blueprint
Open your character (or player controller) Blueprint. You need two events: aim start and aim end.
Aim start:
On Aim Started (InputAction IA_Aim, Started)
  └─> Activate Camera
        Player Index:        0
        Camera Type:         CT_AimDownSights
        Context Name:        Aim
        Transition Override:  None
        Follow Target:       Self
Because Aim wasn't on the stack before, activation auto-pushes it. The gameplay camera is suspended but continues evaluating live (reference leaf).
Aim end:
On Aim Released (InputAction IA_Aim, Completed)
  └─> Get Composable Camera Player Camera Manager (Index 0) ─┐
  └─> Terminate Current Camera
        PCM:                  ↑
        Transition Override:  None
TerminateCurrentCamera pops the top context off the stack. The gameplay camera resumes with whatever transition the resolution chain picks.
Don't pop if already popped
If the player taps aim rapidly, a second TerminateCurrentCamera could try to pop the base Gameplay context (which is a protected no-op, but still wasteful). Guard the release event with a check: GetCameraContextStackDepth > 1 or GetActiveContextName == Aim before popping.
4. Play and verify
Enter PIE. Aim. You should see:
- A quick inertialized blend from the gameplay camera's wide view to the tighter ADS position.
- The aim camera holds for as long as the button is held — tighter offset, slower sensitivity, zoomed FOV.
- On release, a smooth blend back to the gameplay camera — which has been tracking the character the whole time, so the return position is correct.
Open showdebug camera or check the Debug Panel's Context Stack & Evaluation Tree region (CCS.Debug.Panel 1). During ADS, the context stack should show:
Context Stack (depth 2)
  [1] Aim       ← active
  [0] Gameplay
And on release:
Context Stack (depth 1)
  [0] Gameplay  ← active
5. Tuning
A few adjustments once you see it running:
- Transition feels sluggish. Shorten
EnterTransition.TransitionDurationonCT_AimDownSights. For a snappy shooter, 0.1–0.15s is typical; for a cinematic third-person game, 0.25–0.4s. - Pop-out is too slow. Set an explicit
ExitTransitiononCT_AimDownSightswith a shorter duration, or add aTransitionOverrideon theTerminateCurrentCameraBlueprint call. - Want different FOV per weapon. Use a modifier: create a
DA_SniperFOVModifierwithCameraTags = Gameplay.ADSand a modifier class that setsFieldOfView = 35. Add it when equipping the sniper, remove on unequip. The modifier blends via reactivation, so the FOV change is smooth. - Camera fights the gameplay camera during blend. The reference leaf keeps the gameplay camera evaluating live — this is correct and expected. If the gameplay camera's
ControlRotateNodeis fighting the aim camera's rotation during the blend, both cameras are reading the same input and diverging. Consider disabling input on the gameplay camera'sControlRotateNodewhile the aim context is on top (set theRotationInputActorto null via an internal variable, or use a modifier). - Collision pushback behaves differently in ADS. The shorter boom means the camera is closer to the character, so
CollisionPushNodetraces are shorter and may interact with geometry differently. Tune the trace channel or collision push distance specifically for the aim camera.
Where next
- Cutscene Context — same context-push pattern, but driven by a trigger overlap instead of a held button.
- Concepts → Context Stack — the full conceptual model for context pushing, popping, and inter-context blending.
- Custom Modifiers — for weapon-specific FOV overrides and other gameplay-driven parameter tweaks that layer on top of the aim camera.
- [Blueprint API](../user-guide/blueprint-api