By the end of this page you'll have:
- a Camera Type Asset — the data asset that defines a camera's behavior,
- a small graph inside it that makes the camera follow a target and look at it, and
- a Blueprint call that activates the camera at runtime.
It assumes you've finished Enabling the Plugin and that showdebug camera prints an overlay in PIE.
Heads up
The screenshots and graph editor details here describe the dev-v1 iteration of the editor. The editor is still evolving; minor UI changes may be out of sync. File an issue on GitHub if anything is drastically different from what you see.
1. Create a Camera Type Asset
In the Content Browser:
- Right-click an empty area → Composable Camera → Camera Type Asset.
- Name it
CT_ThirdPersonFollow(or whatever you like — theCT_prefix is a suggestion, not a requirement). - Double-click the asset to open the Graph Editor.
You'll see an empty graph canvas with a single output node on the right labeled Camera Output. This is where the camera's final pose comes from each frame.
2. Add a target pivot actor
A follow camera needs to know who to follow. ComposableCameraSystem exposes this via Exposed Variables on the type asset — these become pins on the Blueprint activation node.
For the simplest player-only camera you can skip this variable and set actor source fields such as PivotActorSource and RotationInputActorSource to Controller Controlled Pawn. This tutorial keeps the explicit ExposedPivotActor path because it also works for AI, cutscenes, and non-possessed actors.
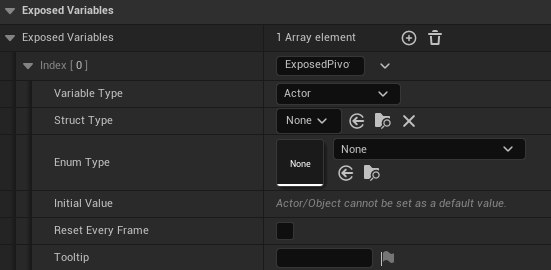
- In the Exposed Variables panel (usually on the right), click + Add.
- Set its Name to
ExposedPivotActor. - Set its Type to
Actor.
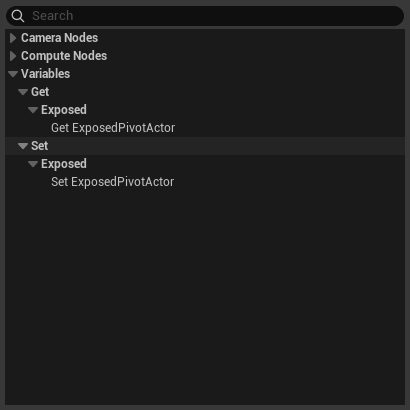
The variable now can appear as a named node in the graph palette; right-click and find it under Variables->Get/Set->Exposed, drag it onto the canvas. This will drive downstream nodes.
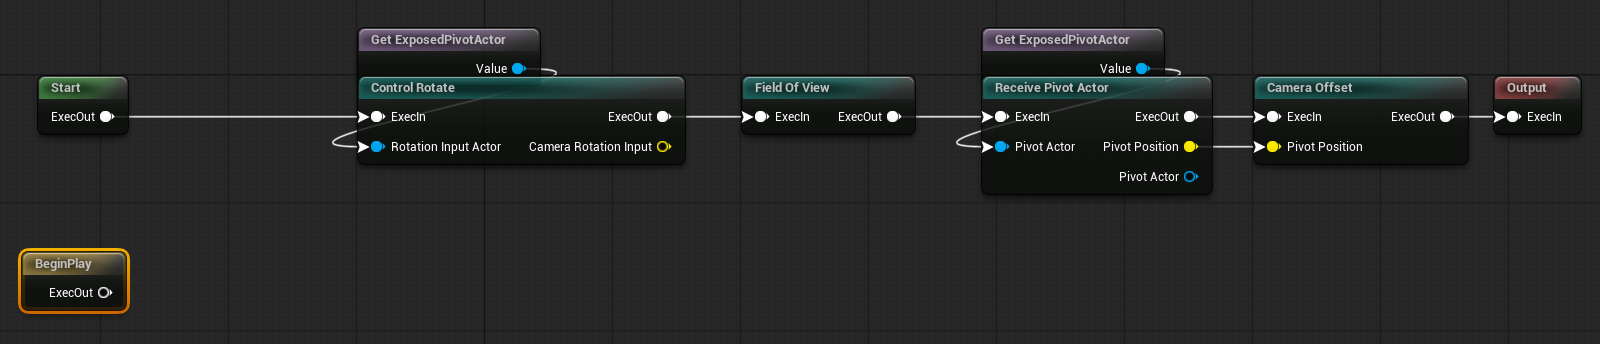
3. Wire up the minimal node chain
For a minimal follow camera we need to answer three questions every frame: what point is the camera tracking, where does the camera sit relative to that point, and where is the camera looking. Three shipped nodes cover those one-to-one, plus a fourth to author the lens:
| Node | Role |
|---|---|
| ReceivePivotActor | Reads FollowTarget's world position and publishes it as the pivot. |
| CameraOffset | Moves the camera to a fixed offset from the pivot. |
| ControlRotate | Rotates the camera according to player input. |
| FieldOfView | Authors the final lens FOV. |
- Drag a ControlRotate node onto the canvas. Wire the
ExposedPivotActorvariable into its Rotation Input Actor input pin. Also set up the Rotate Action node parameter to the one that reads mouse input.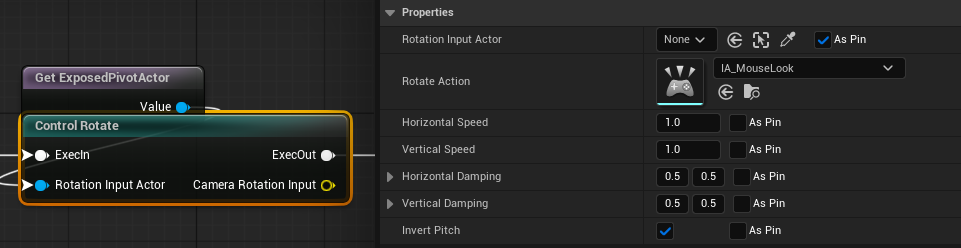
- Drag a FieldOfView node and set its Field Of View value.
- Drag a ReceivePivotActor node onto the canvas. Wire the
ExposedPivotActorvariable into its PivotActor pin.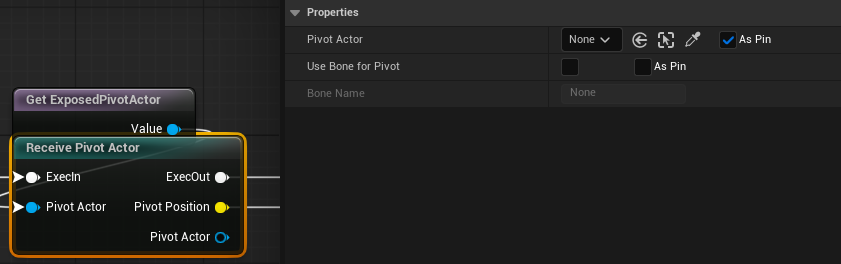
- Drop a CameraOffset node after it. In Details, set CameraOffset to
(-500, 0, 50)— 5m behind the pivot, slightly above. Wire the previous node's pose output into its pose input. - Wire the CameraOffset node to the Output node, completing our setup.
Save the asset (Ctrl+S). The asset‘s Build Messages window should show a green message "Build Succeeded"; any errors will also be shown in the window.
This is the bare minimum — real cameras do more
The Follow Camera tutorial expands this into a production-grade chain with pivot damping, stick-driven orbit input, rotation clamping, and collision pushback. Come back to it after you've got this minimal version running.
4. Activate the camera from a Blueprint
Open your player character or player controller Blueprint and find a convenient place — for example, the BeginPlay event.
- Right-click the graph, search for Activate Camera, and place the node.
- The node has two static pins:
- Camera Type Asset — set this to your new
CT_ThirdPersonFollow. - Player Index —
0for single-player.
- Camera Type Asset — set this to your new
- Once the type asset is set, the node rebuilds its pins to match the variables you defined. Right-click the node, find Add Override Pin, select
ExposedPivotActor, then the pin will show in the node. Wire your character actor (orGet Player Pawn) into it. - Connect the execution pin from
BeginPlayinto the node.
Custom K2 node
Activate Camera is a custom K2 node (UK2Node_ActivateComposableCamera). It introspects the selected type asset and builds matching pins for each exposed variable. If you change the variables on the type asset, right-click the K2 node and pick Refresh Node to pull in the updated pin list.
5. Play
Press Play. Your camera should snap to the configured offset behind the target and track it as it moves. If showdebug camera is still active from the previous page (or CCS.Debug.Panel 1 if you used that instead), the overlay will show:
- Context Stack:
Gameplay - Active Camera:
CT_ThirdPersonFollow(or whatever you named the instance) - Evaluation Tree: a single leaf

Common issues
- "No camera is active" in the debug overlay — the Activate node never ran. Common causes:
BeginPlayfires before your follow target spawns (wire the node to a later event), or the PlayerController class in the GameMode doesn't useAComposableCameraPlayerCameraManager(revisit Enabling the Plugin). - Camera is at world origin, not behind the target — the
ReceivePivotActornode's Actor pin isn't wired, or the actor you're passing in isNone. Print-string the target before the activation call. - Controller Controlled Pawn resolves no actor — the camera is not owned by a
AComposableCameraPlayerCameraManager, the owning controller has no pawn yet, or the asset is being evaluated from Sequencer/editor preview. Use the explicit actor path in those cases. - Camera pops to the new position with no blend — that's expected for a first activation. Blending is driven by transitions, which are covered in Transitions & Blending in the User Guide.
Where next
You now have the full end-to-end loop: plugin installed, PCM swapped, type asset authored, activated from Blueprint. Recommended next reads:
- Concepts — understand what the Context Stack, Director, and Evaluation Tree are actually doing during that
BeginPlaycall. - Authoring Camera Types — the full tour of the graph editor, parameters, variables, and subgraphs.
- Reference → Nodes — catalog of every shipped node