At this point you should have the plugin compiled into your project from Installation. This page turns it on and wires your project up to actually use it.
1. Enable the plugin in Project Settings
- Open the editor.
- Go to Edit → Plugins.
- In the search box, type
ComposableCameraSystem. - Tick the Enabled checkbox next to the plugin.
- Click Restart Now when prompted.
After the restart, verify that the plugin is live by looking at Edit → Plugins → Installed → Other; you should see ComposableCameraSystem marked as enabled, along with its three transitive dependencies (EngineCameras, EnhancedInput, ActorSequence) which are auto-enabled by UE.
2. Swap in the Composable Camera Player Camera Manager
ComposableCameraSystem runs through a custom subclass of APlayerCameraManager called AComposableCameraPlayerCameraManager. Any PlayerController that should use the new camera system needs to be pointed at it.
The recommended way is to set it on your default PlayerController class, so every player in your project picks it up automatically.
If you're using a Blueprint PlayerController
- Open your project's PlayerController Blueprint (often
BP_PlayerControlleror similar — check Project Settings → Maps & Modes → Default Modes → Selected GameMode → Player Controller Class). - In the Class Defaults, find the Camera category.
- Set Player Camera Manager Class to
AComposableCameraPlayerCameraManager. - Compile and save.
If you're using a C++ PlayerController
In the constructor of your PlayerController:
#include "ComposableCameraPlayerCameraManager.h"

AMyPlayerController::AMyPlayerController()
{
    PlayerCameraManagerClass = AComposableCameraPlayerCameraManager::StaticClass();
}
Make sure the file that includes this lists ComposableCameraSystem in its module .Build.cs:
PublicDependencyModuleNames.AddRange(new[]
{
    "Core", "CoreUObject", "Engine", "InputCore",
    "ComposableCameraSystem",
});
If you haven't customized the PlayerController at all
You'll need a custom one for this setup. The quickest path is to create a small Blueprint subclass of PlayerController, set its Player Camera Manager Class as above, and then in Project Settings → Maps & Modes, set Default Modes → Selected GameMode → Player Controller Class (or your game mode's Player Controller Class) to your new Blueprint.
Setups for the Composable Camera Player Camera Manager
The recommended way is to create a new PCM class from AComposableCameraPlayerCameraManager so that you can tweak some of its parameters inside. Currently the only parameter of a AComposableCameraPlayerCameraManager class you can tune is bSyncToControlRotation:
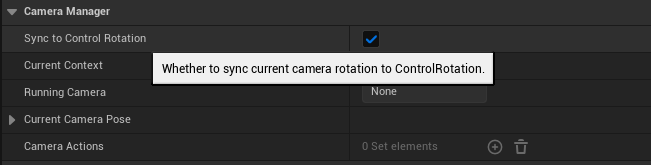
The default value is true. If you want to turn it off, the only way is to create your own PCM class inheriting AComposableCameraPlayerCameraManager and toggle it in blueprint.
3. Verify in PIE
- Open any level in your project.
- Press Play (Alt+P or the toolbar's Play button) to enter Play-In-Editor.
-
Open the console (backtick
`) and type:showdebug cameraYou should see an on-screen debug overlay showing the active camera context stack, the current camera, and the current evaluation tree.
You can also type
CCS.Debug.Panel 1to enable the always-on debug panel — it shows the same information in a richer layout and stays on across PIE restarts until you turn it off withCCS.Debug.Panel 0.
If the overlay doesn't appear:
- Nothing at all on screen — the
showdebugcommand is typo-sensitive. Make sure you typedcamerawith no spaces. - Debug says "No Composable Camera PCM" — your PlayerController is still using the default
APlayerCameraManager. Re-check step 2 and confirm that the PlayerController you set the class on is actually the one your GameMode spawns. - Editor crashes or fails to PIE — check the output log for
LogComposableCameraSystemerrors. The most common cause is a missing transitive engine plugin dependency; re-enableEngineCameras,EnhancedInput, andActorSequence.
What's happening under the hood
AComposableCameraPlayerCameraManager replaces the default per-frame camera update logic with a pipeline that owns:
- a Context Stack (gameplay / cutscene / UI-style modes),
- a Director per context, and
- an Evaluation Tree per director that blends cameras and nodes into the final pose each frame.
You don't interact with those directly yet — activating a camera (the next page) handles the plumbing. For the full picture see Concepts.
Once the debug overlay is printing, you're ready to author your first camera.