Shot-Based Keyframing lets you author cinematic framing as data instead of keyframing a CineCamera transform directly. A Shot describes the targets, where the camera should be placed, where it should aim, how the lens should solve, and how focus should follow. Sequencer decides when each Shot is active; the CCS Composition Solver decides the camera pose every frame.
Use this workflow when the subject can move, spawn, or be rebound per sequence, but the composition should stay stable: over-the-shoulder shots, close-ups, two-shots, dialogue coverage, boss reveals, and shots that need dead-zone or soft-zone damping while the actor keeps moving.
What we're building
A Level Sequence with a AComposableCameraLevelSequenceShotActor, one
Composable Camera Shot Track, and two overlapping Shot Sections. The first
Shot frames a wide two-shot. The second Shot frames a close-up. The overlap
between the sections becomes the transition zone.
Under the hood:
- The Shot Actor owns a CineCamera root and an internal one-node TypeAsset
whose node is
CompositionFramingNode. - Each Shot Section pushes an
FComposableCameraShotinto that node while the section is active. - The Composition Solver runs the Placement, Aim, Lens, and Focus passes.
- If two Shot Sections overlap, both Shots solve and the incoming section's
EnterTransitionblends the resulting poses across the overlap window. - The Level Sequence component projects the solved pose onto the actor's CineCamera, so the normal Camera Cut track can view it.
Prerequisites
- A project with CCS enabled and
AComposableCameraPlayerCameraManagerin use. - A Level Sequence with at least one animated subject.
- Familiarity with Level Sequence Integration and CCS Camera in Sequencer.
1. Add the Shot Actor
Open the Level Sequence and add Composable Camera Level Sequence Shot Actor as either a Spawnable or a Possessable.
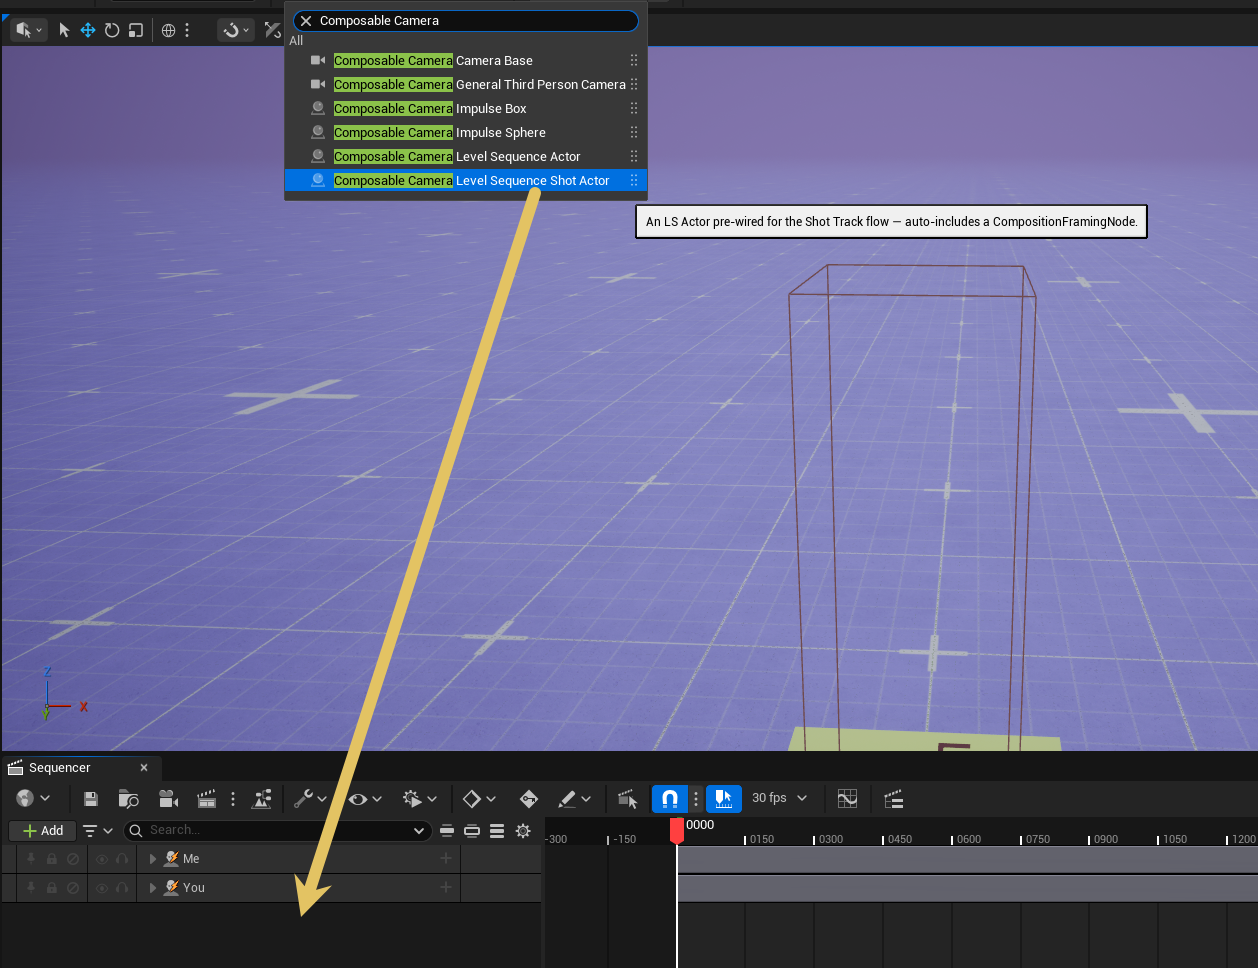
Prefer the Shot Actor for this workflow. It is a subclass of
AComposableCameraLevelSequenceActor that auto-creates the default internal
TypeAsset containing a CompositionFramingNode, so you do not need to build a
camera graph before adding Shot Sections.
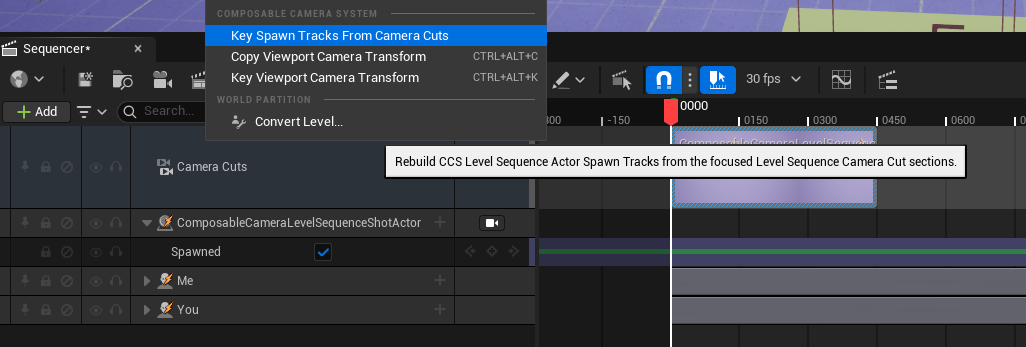
Add or verify a Camera Cut section that targets the Shot Actor. The Shot Track drives framing data, but the Camera Cut track is still what makes the actor's CineCamera the active viewport camera.

For Spawnable Shot Actors, run Tools -> Composable Camera System -> Key Spawn Tracks From Camera Cuts after editing Camera Cut timing. The command keys the actor's Spawn Track from the Camera Cut ranges, so the Shot Actor is alive only when the sequence cuts to it and its Level Sequence component is evaluating.
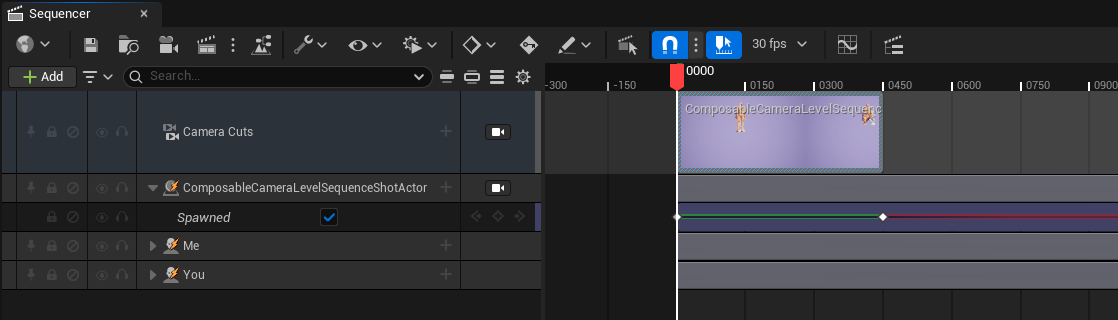
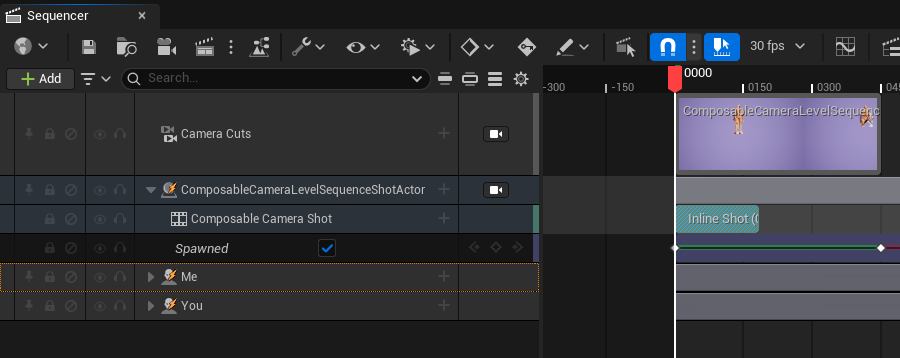
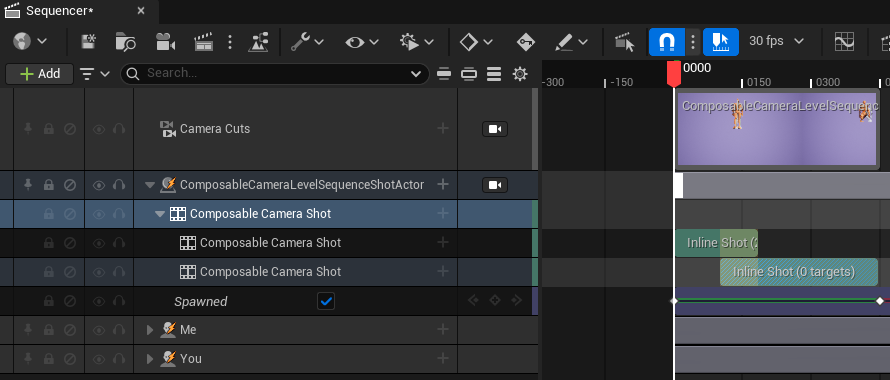
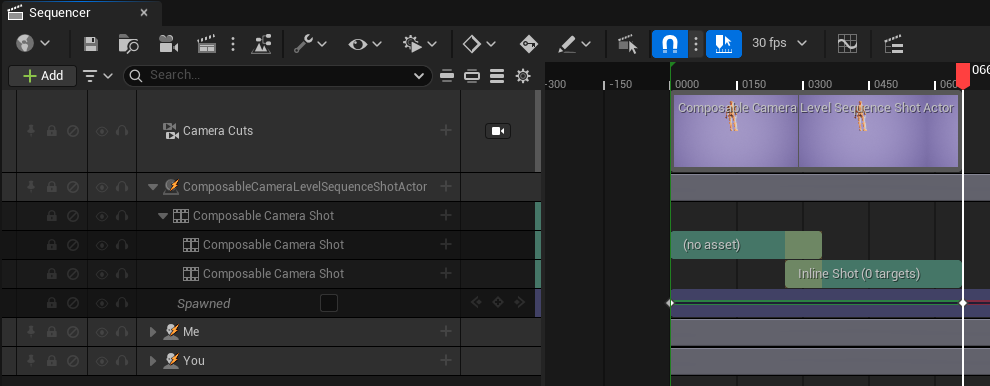
It should look like this if you finish:
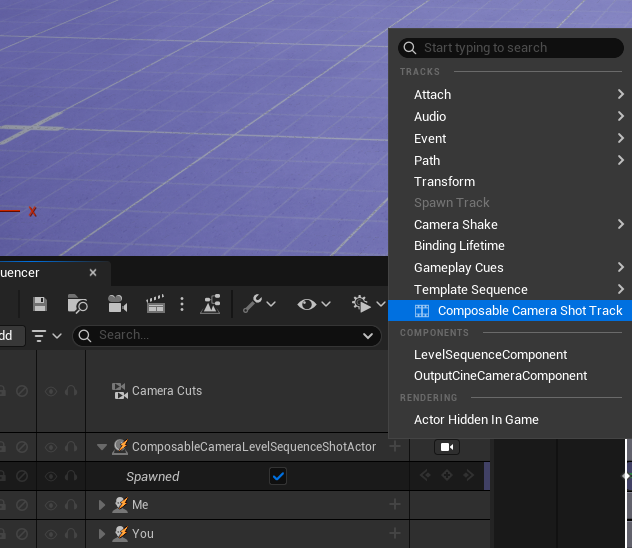
2. Add a Shot Track
In Sequencer, click the + button on the track to create a Composable Camera Shot Track. The track is binding-scoped, not root-level, so it only
appears under AComposableCameraLevelSequenceActor and subclasses.
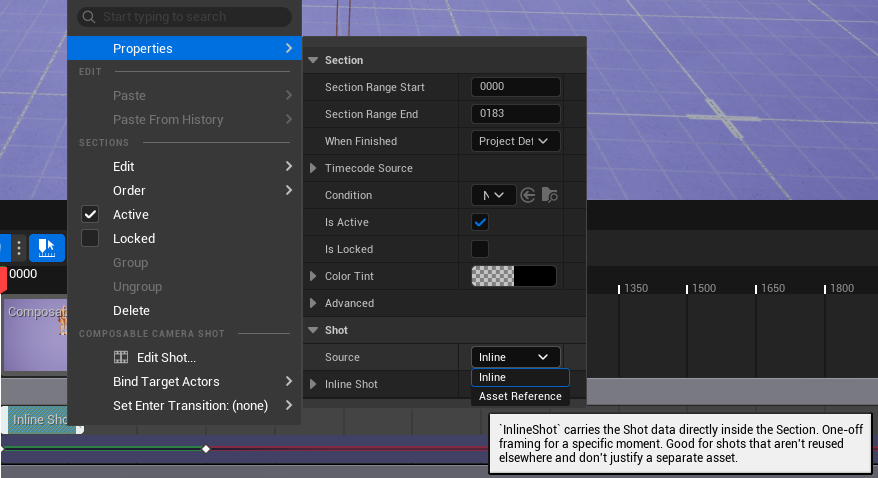
Click the track's + Section button to create an inline Shot Section at the
playhead. Inline sections are best for one-off framing. If you want reusable
framing presets, create a UComposableCameraShotAsset and drag it onto the
Shot Actor binding; the new section uses AssetReference mode and points at
that asset.
3. Open the Shot Editor
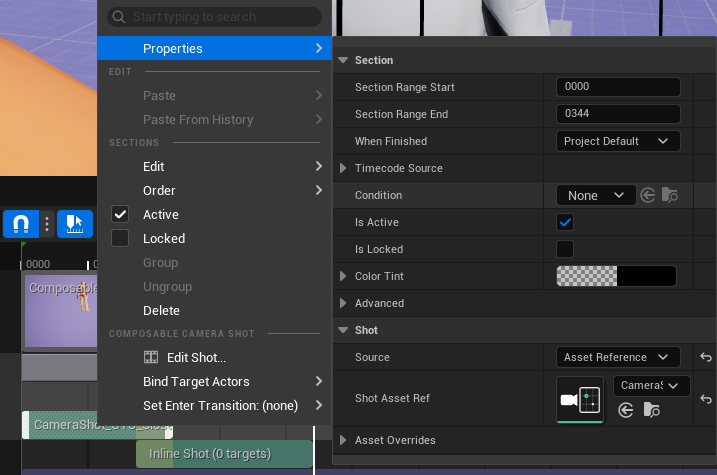
Right-click the Shot Section and choose Edit Shot....
The Shot Editor edits the active Shot source:
| Section source | Edited object |
|---|---|
Inline |
the section's embedded InlineShot value |
AssetReference |
the section's local ShotOverrides copy, seeded from the referenced UComposableCameraShotAsset |
Asset-backed sections are intentionally copy-on-pick. Choosing a Shot Asset copies the asset's Shot into the section, and later edits in Sequencer affect only that section. The shared Shot Asset remains the template used for new sections.
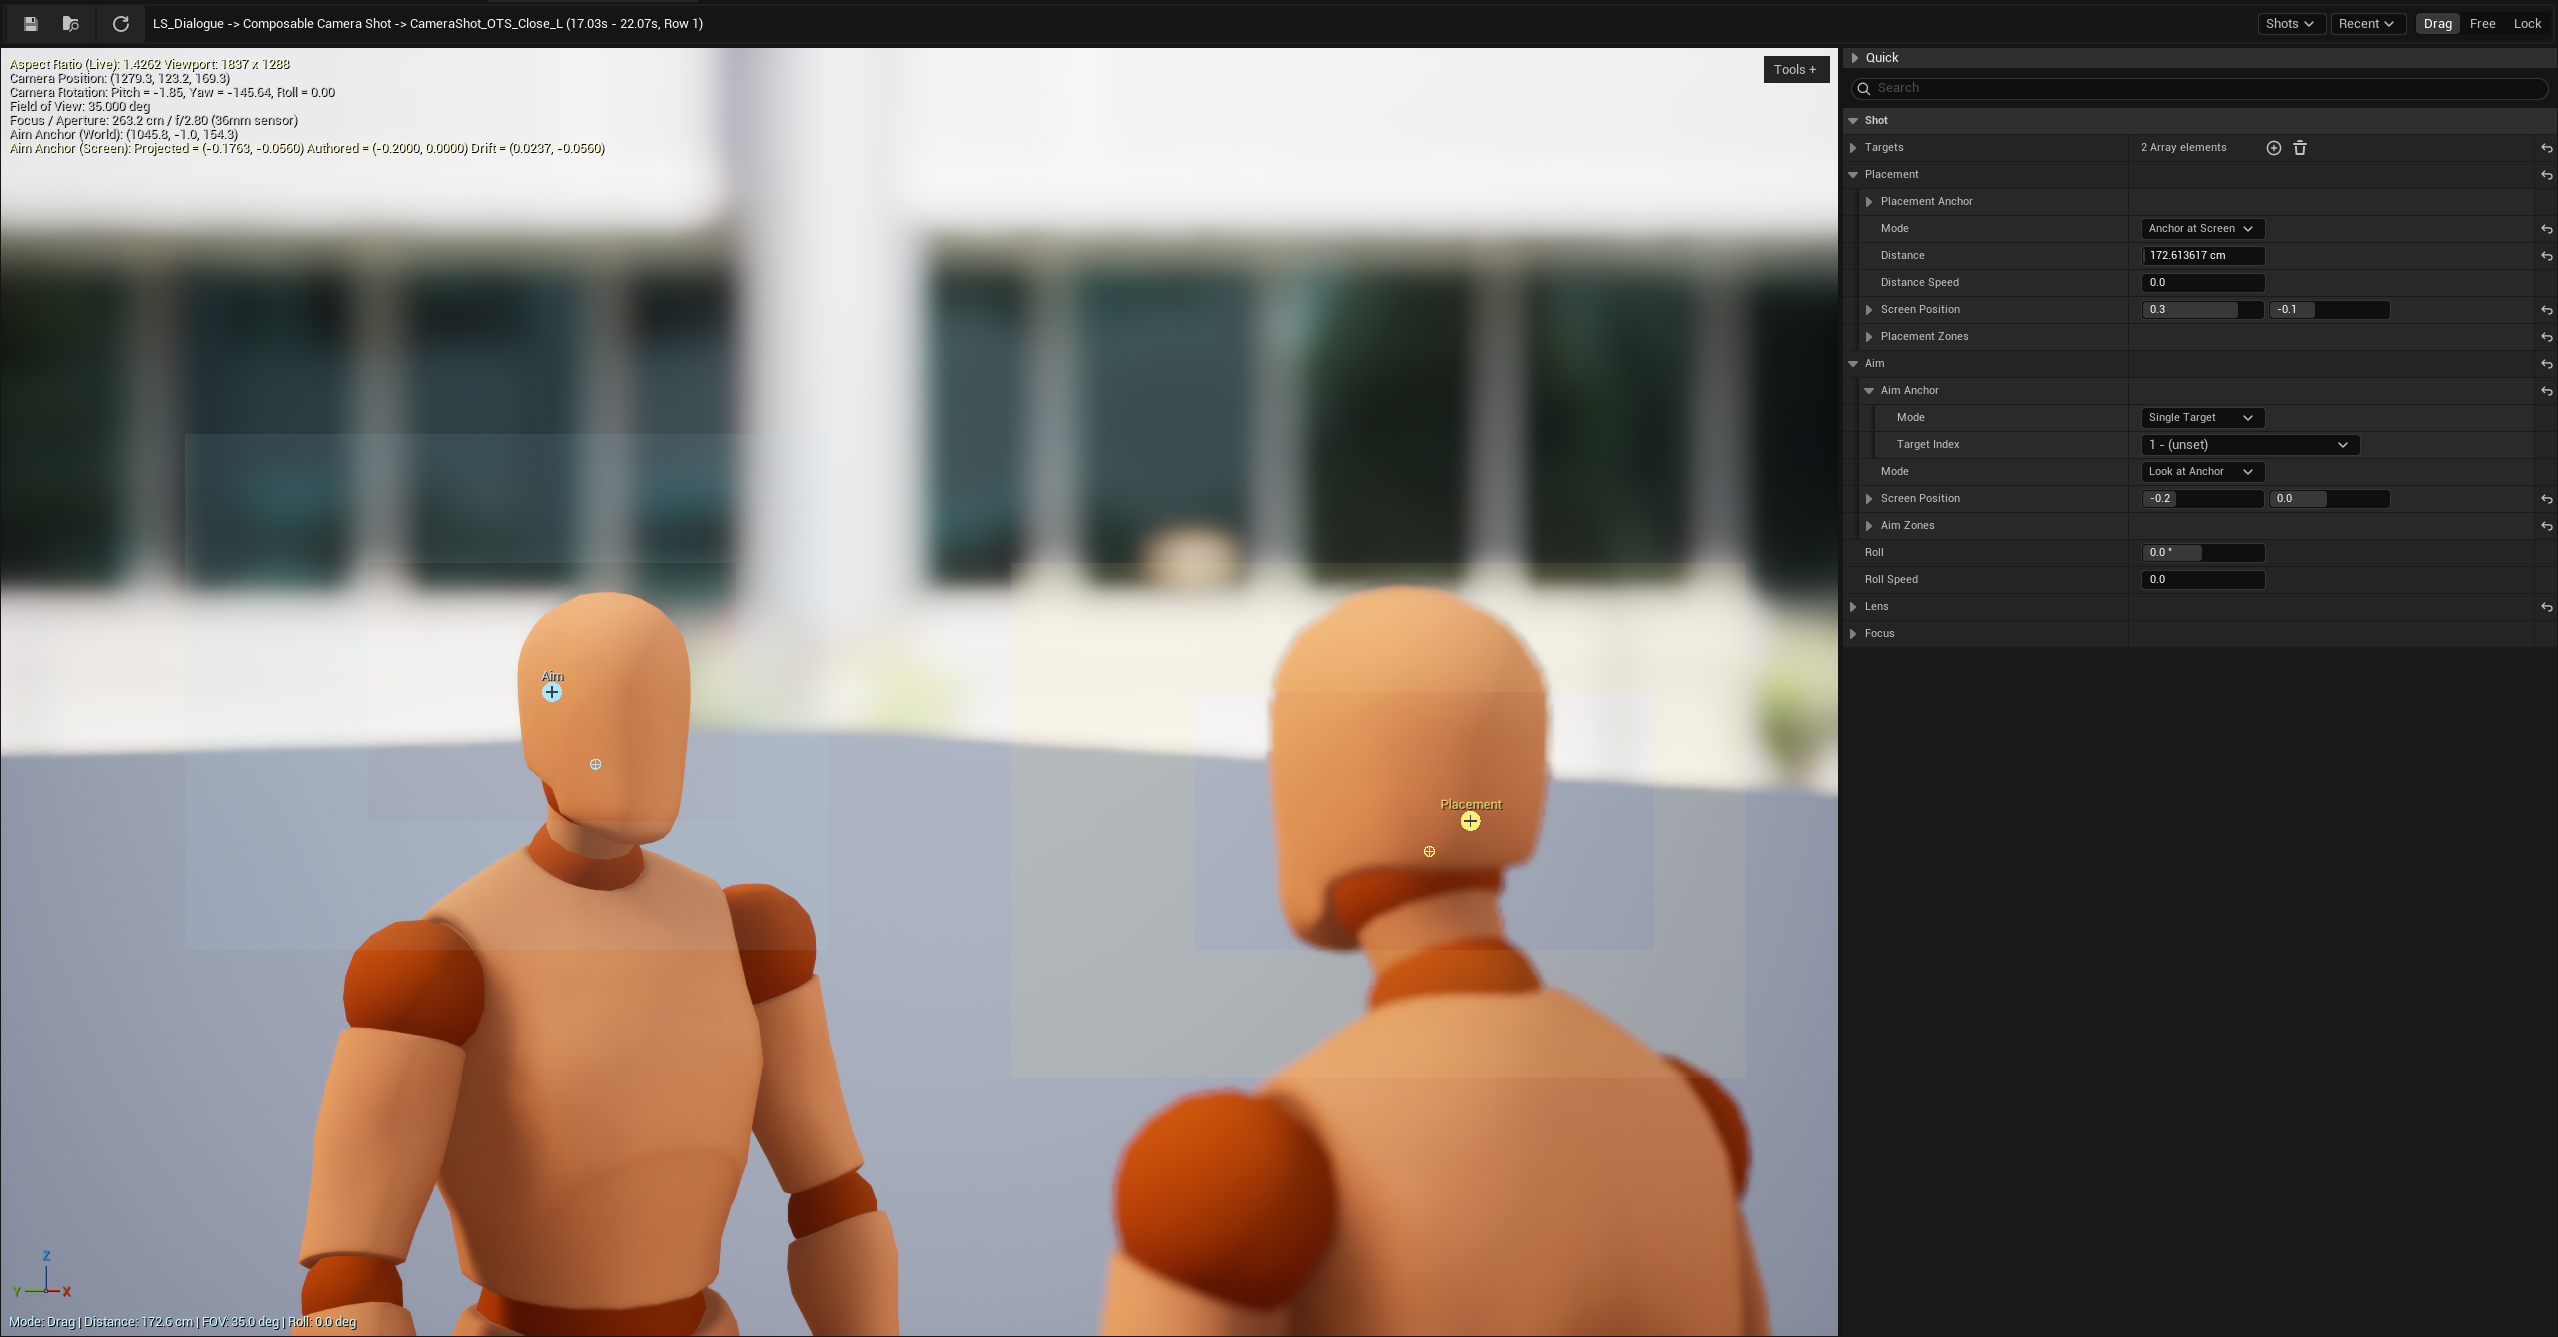
The editor viewport has three modes:
| Mode | Purpose |
|---|---|
| Drag | move interactive Placement and Aim handles in screen space |
| Free | fly the preview camera manually |
| Lock | inspect the solved camera without accidental edits |
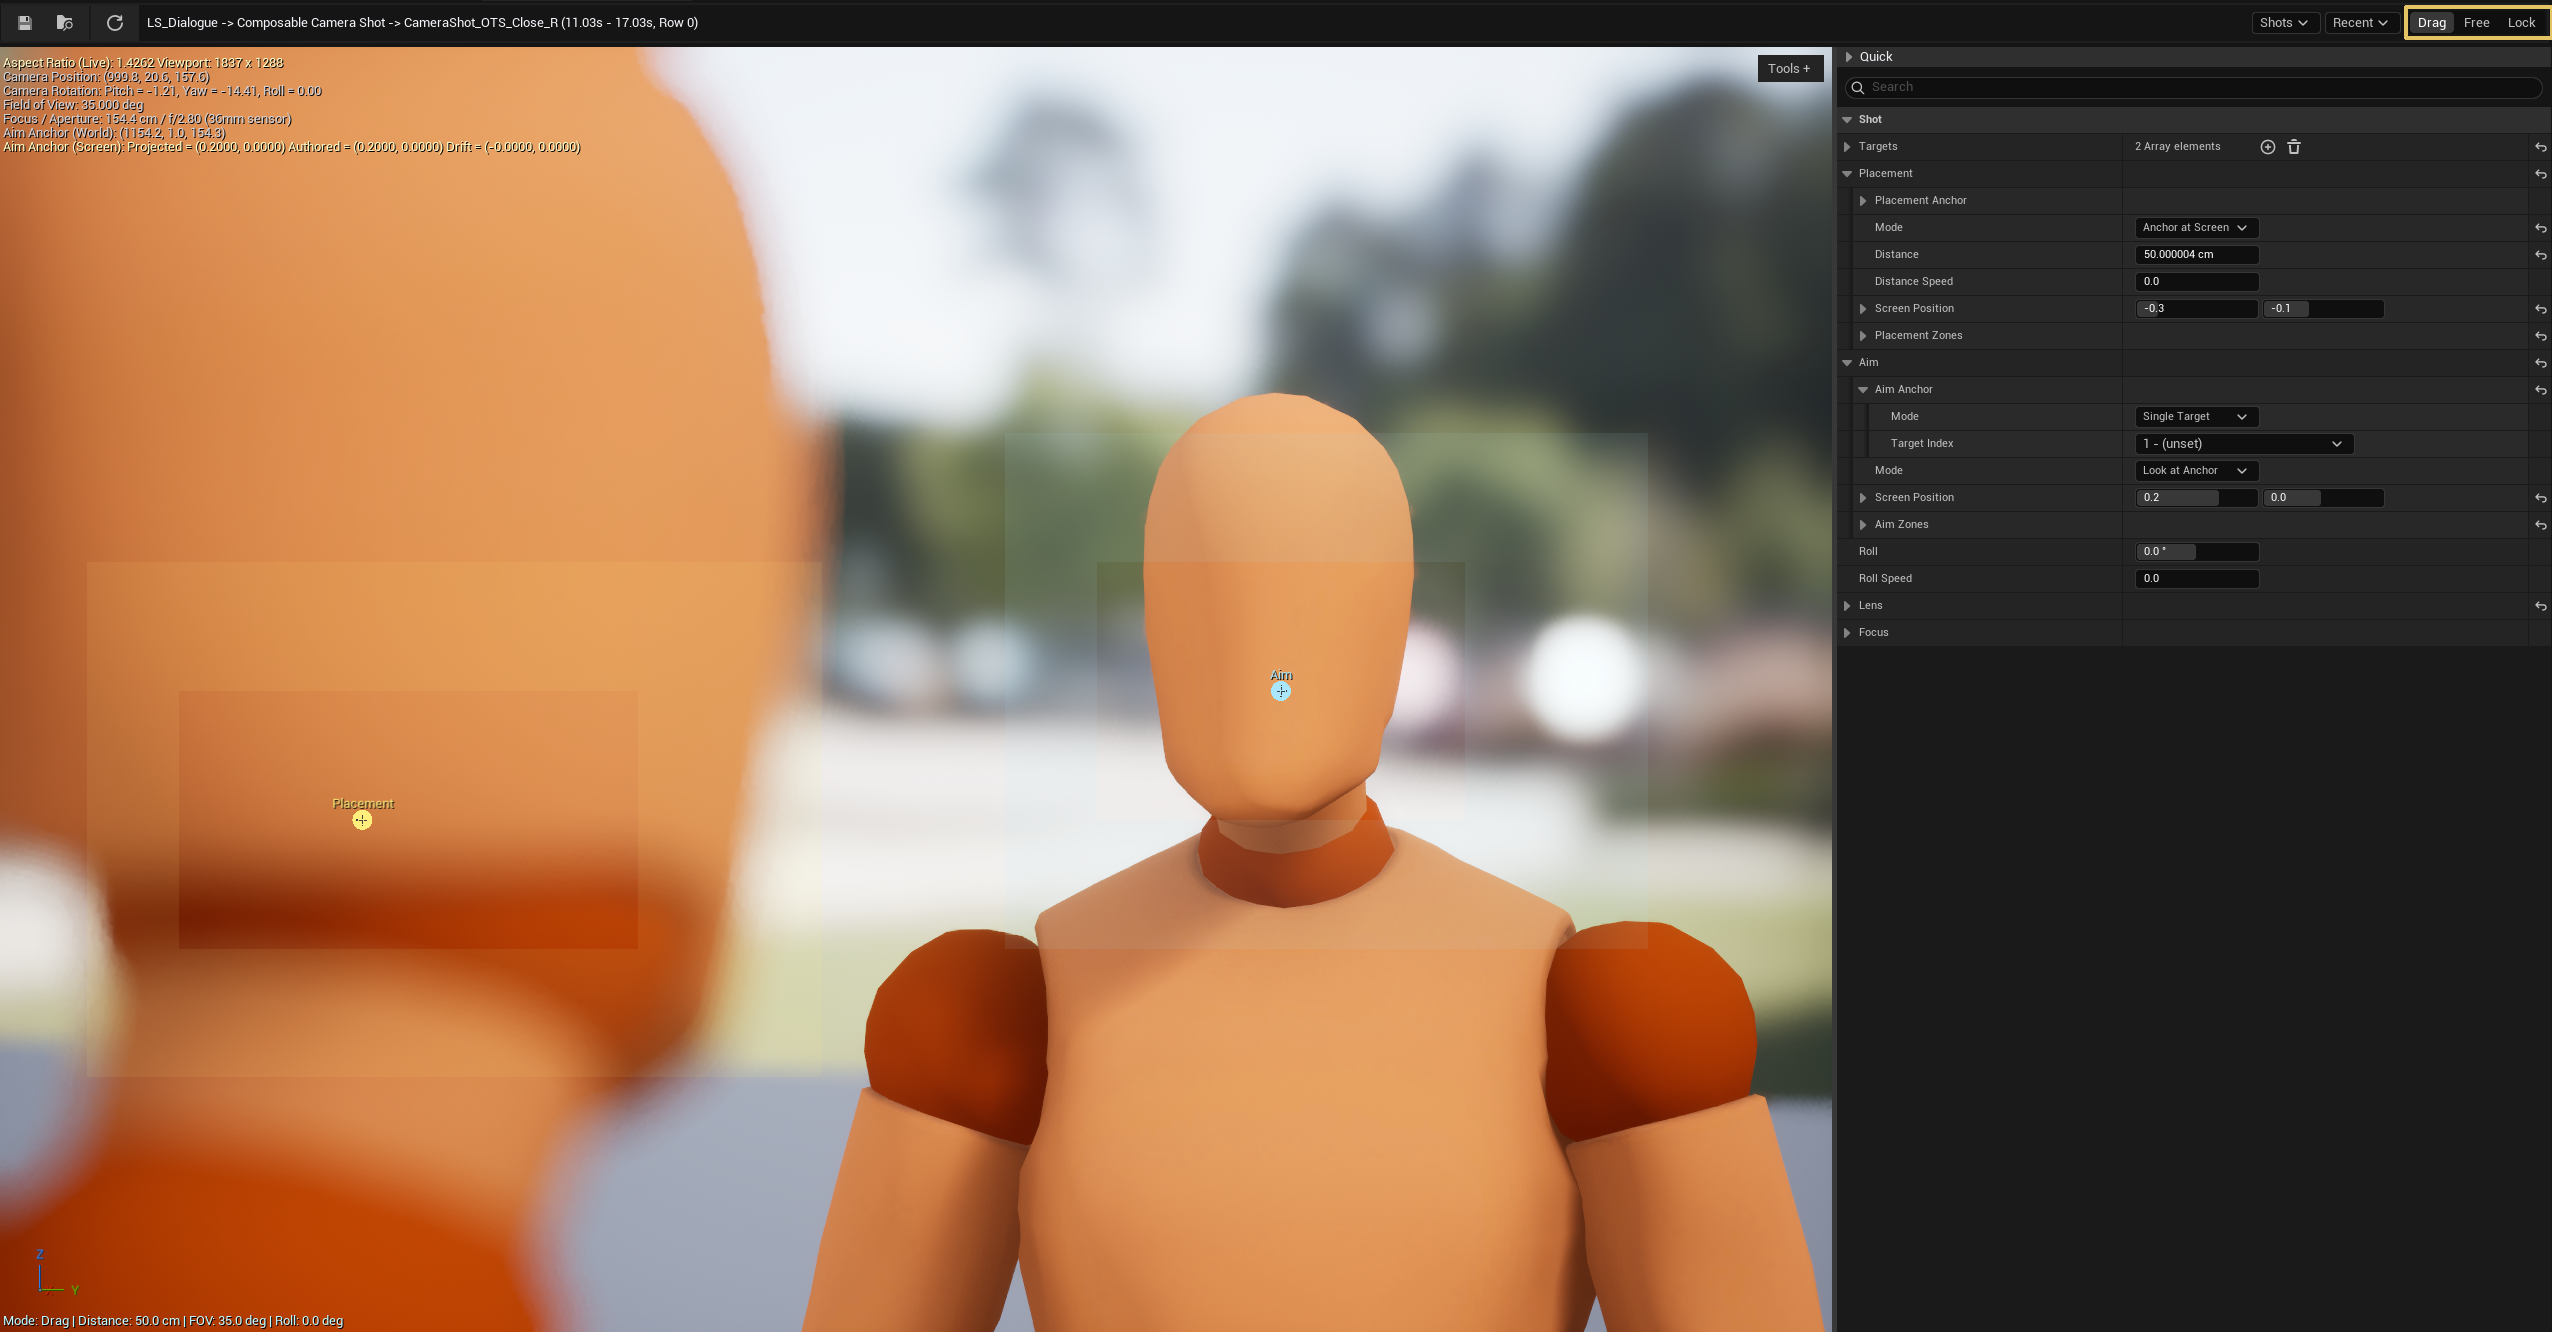
The top bar contains the asset commands, active Shot breadcrumb, Sequencer Shot dropdown, Recent dropdown, and Drag / Free / Lock mode selector. Use the Shot dropdown to jump between sibling Shot Sections in the same Level Sequence; it replaces the older persistent side outliner with a searchable grouped menu.
The right pane combines the full Shot Details panel with a collapsed-by-default Quick strip for common fields: distance, manual FOV, roll, placement screen position, and aim screen position. Quick writes the same Shot data as Details, so use it for fast numeric passes and use Details when you need the complete Placement, Aim, Lens, Focus, target, and transition surface. The Details panel hides rows ignored by the current mode instead of disabling them; hidden values are preserved and reappear when you switch back to a mode that uses them.
The viewport's floating Tools control owns Reset, HUD, and Guides. Reset is available only in Free mode and snaps the preview camera back to the current solved Shot pose without changing Shot data. HUD toggles the viewport diagnostic readout, and Guides toggles handles, zones, and bounds wireframes.
When leaving Free mode, the editor queues the requested Drag or Lock mode and shows Save, Discard, and Stay in the status bar below the top bar. Save reverse-solves the current view back into the Shot fields that the active modes read, Discard leaves the Shot unchanged, and Stay keeps the viewport in Free mode. If reverse-solve is unavailable, the same status bar explains which anchor or Shot context must be fixed first.
4. Author targets
Add one or more targets in the Shot's Targets array. Each target contains an Actor reference plus optional bone, offset, and bounds data.
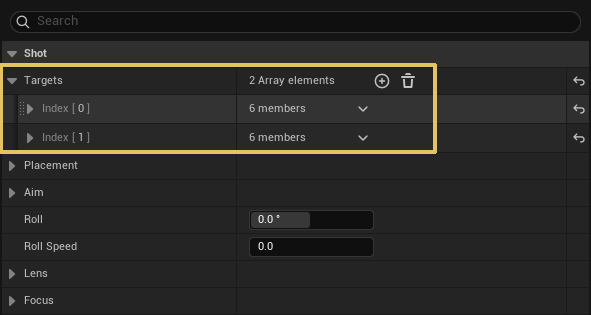
Targets are pure world-space identity. They do not carry screen positions. Placement, Aim, and Focus each reference target indices through their anchor settings. This keeps the same target list reusable across close-ups, wide shots, and focus pulls.
For skeletal subjects, enable bone pivoting and pick a bone or socket from the searchable combo. For bounds-fit lens solving, use component bounds or explicit bounds that match the visible subject rather than attached cameras, debug helpers, or other non-subject components.
For reusable Shot Assets that are not bound to live Sequencer actors yet, set
Editor Preview Mesh and Editor Preview Transform on each target. These
editor-only fields drive the Shot Editor preview proxy and bone/socket picker
when no Level Sequence binding or authored Actor resolves. Runtime evaluation
and Sequencer playback ignore them; use Section target binding overrides for
real playback actor identity.

5. Set Placement
Placement controls where the camera is.
| Mode | Use it for |
|---|---|
AnchorOrbit |
camera orbits around a placement anchor at a distance |
AnchorAtScreen |
keeps the placement anchor at an authored screen position |
FixedWorldPosition |
locks the camera to an explicit world location |
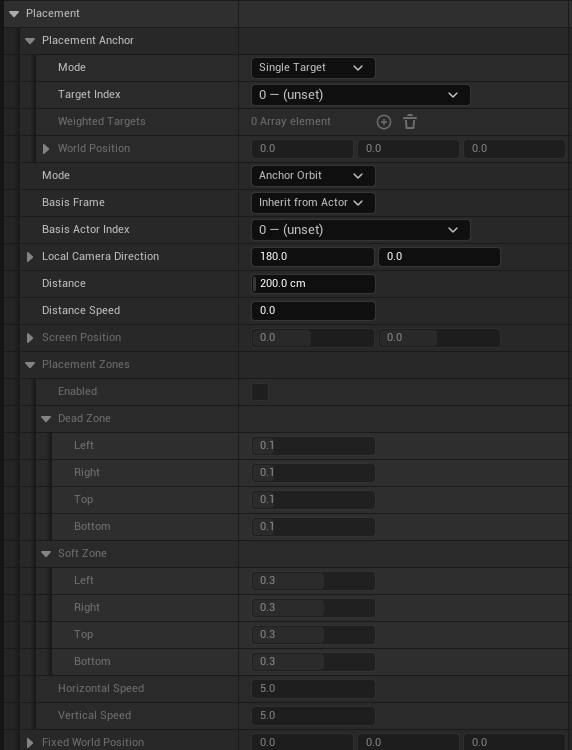
AnchorOrbit is the usual starting point. Set the Placement Anchor to the
main target, tune Distance, then adjust LocalCameraDirection. Use
AnchorAtScreen for over-the-shoulder framing where the subject's position in
the frame matters more than the orbit angle.
Placement zones are only consumed by AnchorAtScreen. Enable them when you
want Cinemachine-style dead and soft zones: the camera holds while the anchor
stays inside the dead zone, eases back toward the edge when it leaves, and
hard-clamps to the soft zone.
6. Set Aim
Aim controls camera rotation.
| Mode | Use it for |
|---|---|
LookAtAnchor |
rotate so the Aim Anchor lands at Aim.ScreenPosition |
NoOp |
leave rotation as identity plus Shot roll |
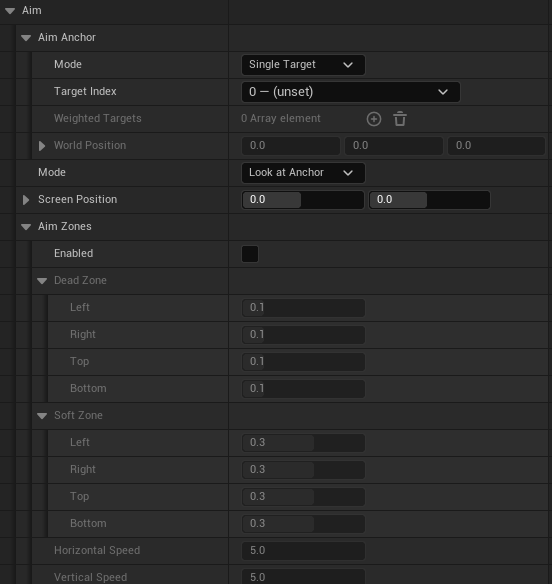
Most cinematic shots use LookAtAnchor. Pick the target to look at, then
drag the cyan Aim handle to compose the subject on screen. Aim zones work like
Placement zones but affect rotation rather than camera translation.
Use Shot Roll for dutch angles or rolled compositions. The solver preserves
authored screen positions under roll, and the Shot Editor can round-trip roll
from Free mode.

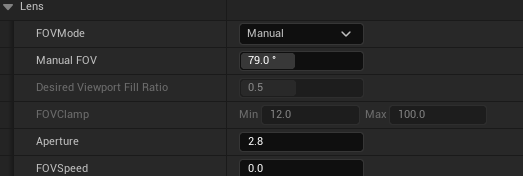
7. Set Lens and Focus
Lens decides field of view.
| FOV mode | Use it for |
|---|---|
| Manual | fixed FOV authored on the Shot |
| Bounds fit | solve FOV from target bounds and viewport fill |
Bounds-fit mode is useful for close-ups and two-shots where the target size should stay readable as actors move. Keep the target bounds tight enough to describe the visible subject.
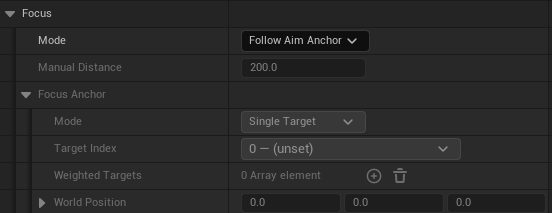
Focus can be manual, follow the Placement Anchor, follow the Aim Anchor, or follow a custom anchor. Focus distance is camera-space depth, matching what the CineCamera depth-of-field pipeline expects.
8. Bind targets for Sequencer
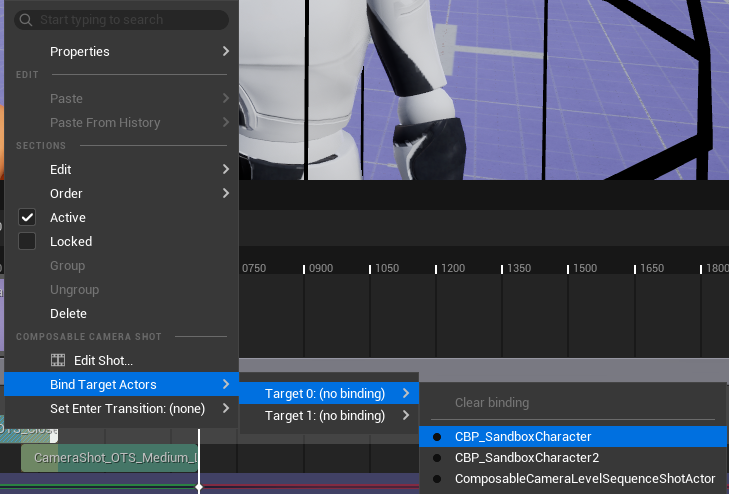
If the Shot references actors that are not stable level actors, use the Shot Section's right-click menu:
Bind Target Actors -> Target N -> Sequencer binding
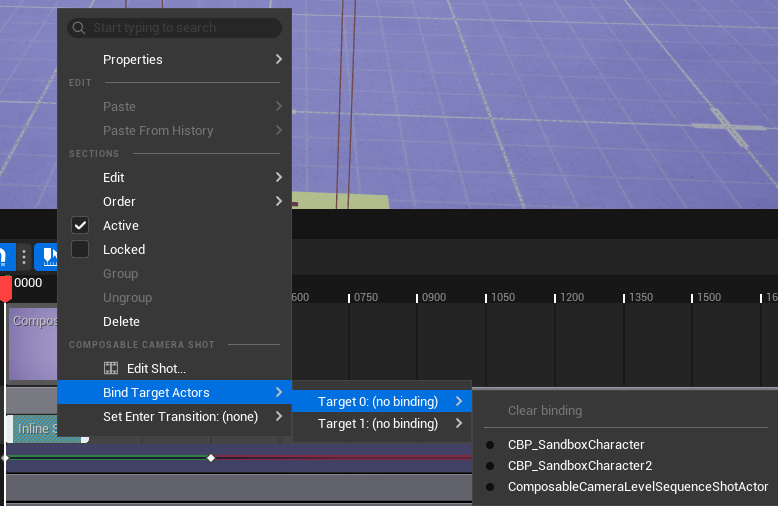
This writes a per-section override. At evaluation time, the section starts
from the inline Shot or the asset-seeded ShotOverrides copy, then
substitutes the target actor from the running Sequencer binding. The
underlying Shot Asset is not mutated.
Use binding overrides for Spawnables, reusable Shot Assets, or sequences that reuse the same framing preset with different actors.
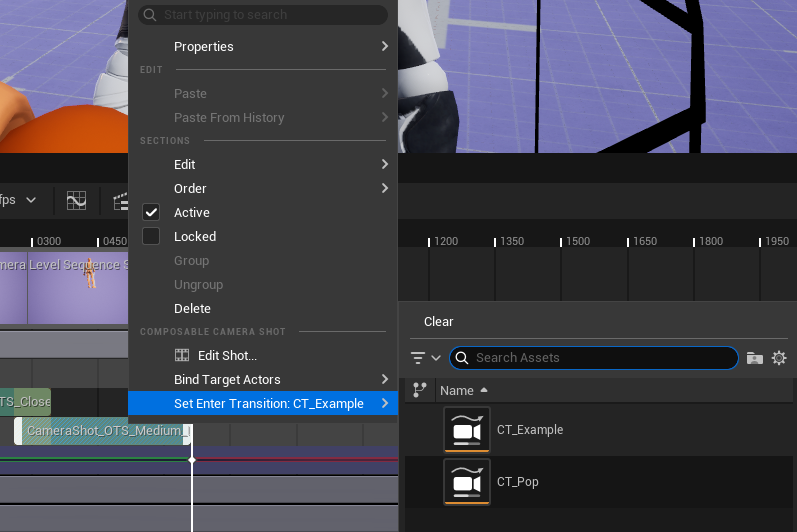
9. Blend between Shots
Create a second Shot Section on another row and make the two sections overlap in time. The overlap band is the transition window.
On the incoming section, right-click and choose Set Enter Transition. Pick
a UComposableCameraTransitionDataAsset.
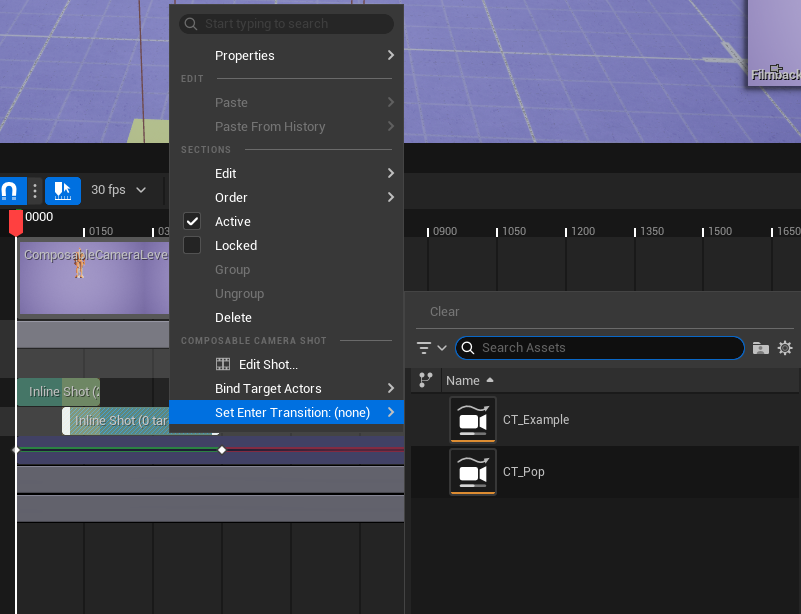
The overlap duration controls the transition duration. The transition asset's
own TransitionTime is ignored in this path; the asset contributes the blend
curve and pose blend behavior. A null EnterTransition is a hard cut.
For the first section in a sequence, EnterTransition has no effect because
there is no previous Shot to blend from.
10. Preview and debug
Scrub the sequence with the Camera Cut viewing the Shot Actor. The Shot Editor preview and the Sequencer viewport should agree on framing.
Inside the Shot Editor, enable HUD from the viewport Tools control when you need to inspect the preview camera pose, aspect ratio, or focus readout. Enable Guides when you need to compare authoring handles and screen zones against the solved image. These toggles affect the editor preview viewport; the runtime / Sequencer overlay below is still controlled by console variables.
Useful debug tools:
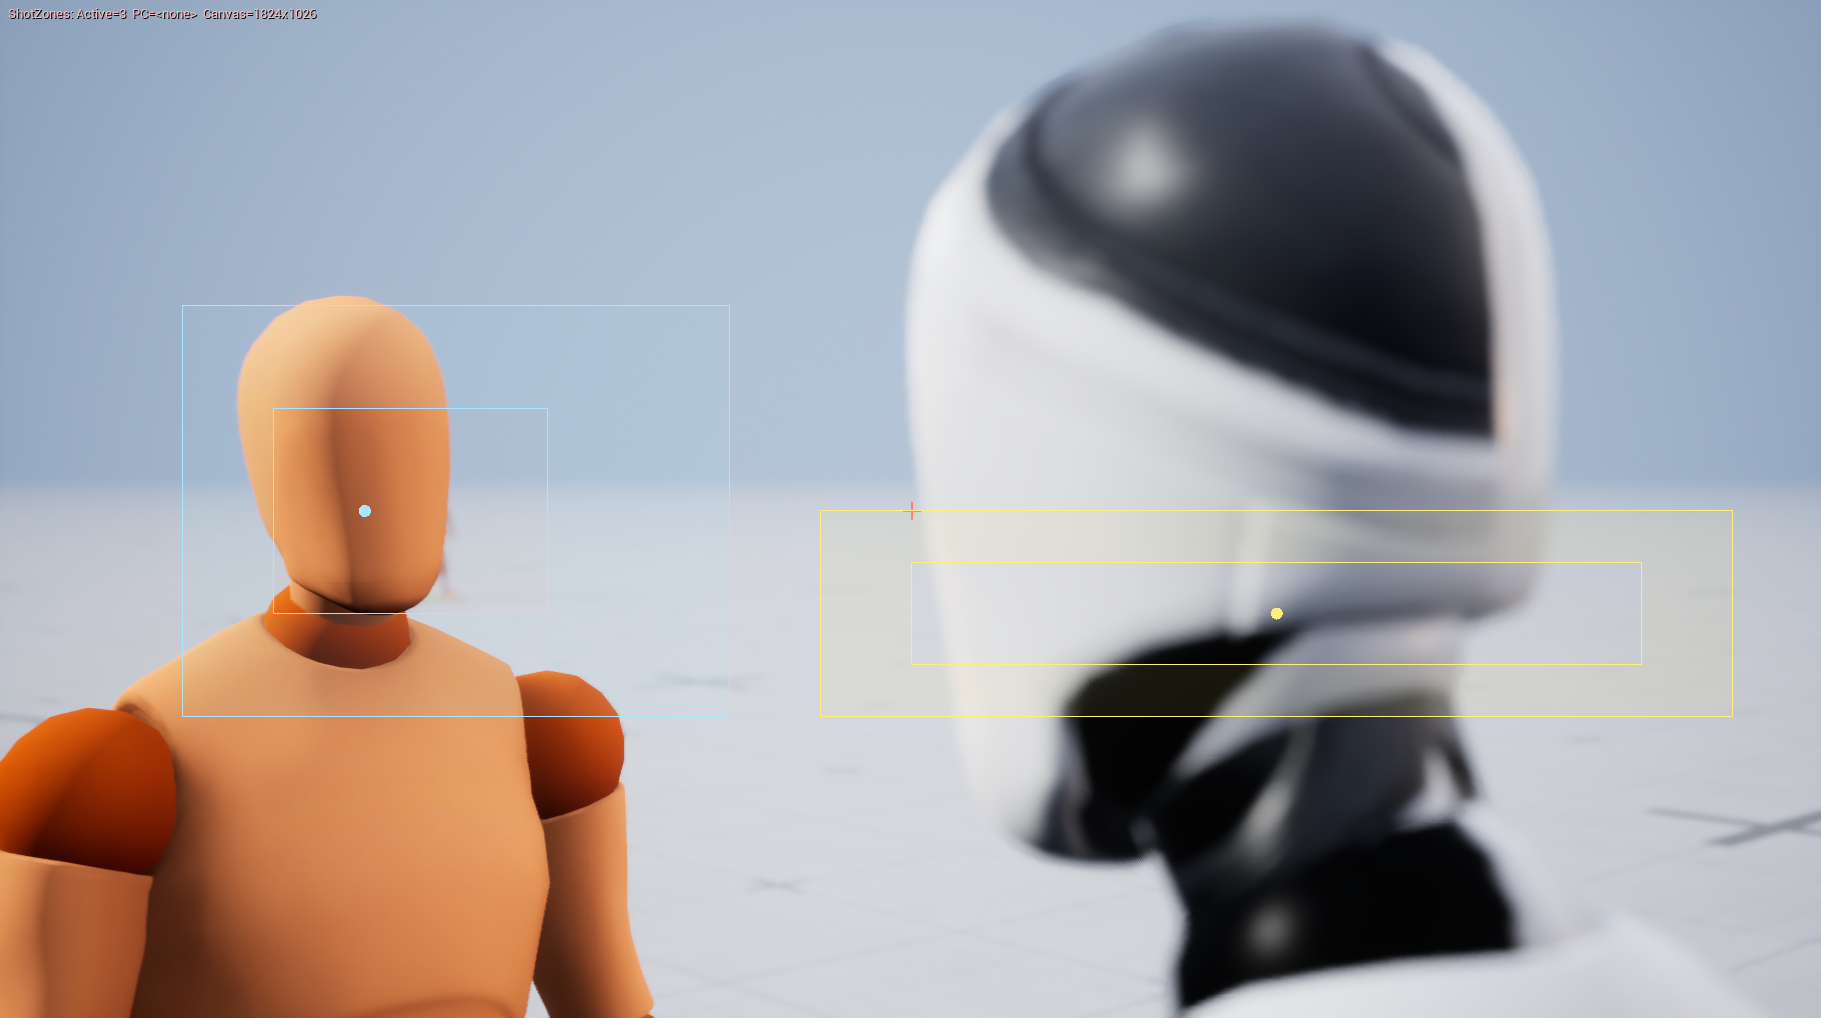
CCS.Debug.Viewport.ShotZones 1
CCS.Debug.Panel 1
showdebug camera
CCS.Debug.Viewport.ShotZones 1 draws the active Shot's dead and soft zones
in PIE, Game, and Sequencer-scrub viewports. It is independent from the 3D
viewport debug master switch.
11. Use Preset Shots
The plugin's content folder /Content/ComposableCameraSystem/CameraPresets/Preset_Shots contains several two-person dialogue shots such as CameraShot_OTS_Close_R and CameraShot_OTS_MediumClose_L. Each type of shot has two versions, viewing from the left and right shoulder indicated by the postfix _L or _R.
First, create two Shot Sections and make them overlap.
Then, right click each, select Source = Asset Reference and Shot Asset Ref = CameraShot_OTS_Close_R/CameraShot_OTS_Medium_L. You can optionally override the parameters inside the asset.
Next, right click each Shot Section and assign target actors to each binding.
Right click the second shot and select a transition for it.
Now, play and enjoy your work!
Common pitfalls
- The Shot Track menu is missing. Select the Shot Actor binding row. The track is not a root-level track.
- The viewport stays at the default pose. Make sure a Camera Cut section targets the Shot Actor and overlaps the Shot Section.
- AssetReference edits do not update the source Shot Asset. This is
expected. Asset-backed sections snapshot the asset into
ShotOverridesso Sequencer edits stay local to the section. Change the Shot Asset directly when you want future sections to inherit new defaults. - Spawnable targets resolve to null. Bind them through Bind Target Actors on the Shot Section.
- Overlap does not blend. Set
EnterTransitionon the incoming section. Without a transition asset, the overlap behaves as a hard cut. - The camera jumps when a target leaves the frame. Enable and tune dead
and soft zones, or use
AnchorAtScreenfor Placement when the screen position itself is the invariant.
Where next
- Debugging - Shot zone overlay details.
- Node Catalog: CompositionFramingNode - runtime node reference.
- C++ API: FComposableCameraShot - Shot data model.
- C++ API: UMovieSceneComposableCameraShotSection - Sequencer section behavior.